Before diving into the delightful layers of a homemade Dairy Queen ice cream cake, let's talk pairings. There’s nothing better than a sweet treat complemented by flavors that sing in harmony.
A slice of ice cream cake perfectly matched with a rich coffee, vibrant fruit salad, or perhaps a drizzle of warm chocolate sauce.
For a whimsical twist, serve a side of crunchy nuts or fresh berries. These accompaniments elevate the experience and make every bite feel like a celebration. Ready to be the star of your next gathering? Let's dig in!
What is Homemade Dairy Queen Ice Cream Cake?
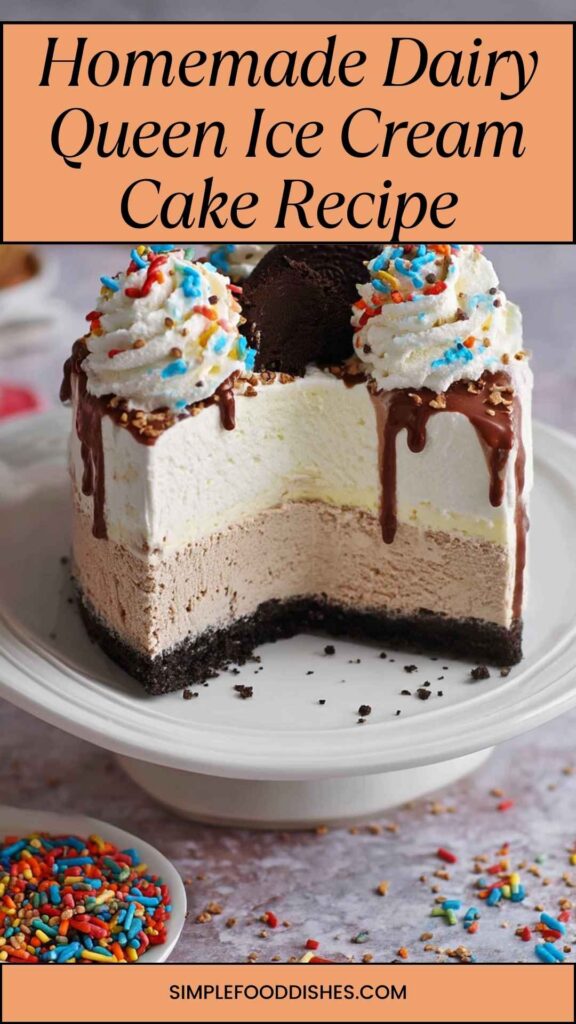
A homemade Dairy Queen ice cream cake is a unique mashup of ice cream and cake, layered to create an unforgettable dessert. It combines two main flavors: vanilla and chocolate, with a smooth fudge layer trapped in between.
The cake is topped with whipped cream frosting, adding lightness to each bite. This cake doesn't just satisfy a sweet tooth; it transports you back to those nostalgic days while being easy enough to whip up in your kitchen.
What is the Flavor Profile of This Dish?
The flavor profile is a wonderland of creamy vanilla mingling with rich chocolate. Each bite is filled with texture — crunchy Oreo cookies add a delightful crunch, while the silky fudge sauce combines a luxurious richness that's hard to resist.
The whipped cream acts as a fluffy counterpoint to the denser chocolate and ice cream layers. Imagine sinking your teeth into this irresistible combination: cool, sweet, and reminiscent of childhood summers.
What Makes This Recipe Different From Other Homemade Dairy Queen Ice Cream Cakes?
What sets this recipe apart is the attention to detail and the personal touch. Most recipes use store-bought components, but here, we create a rich homemade hot fudge sauce that will make your cake sing.
Using finely crushed Oreo cookies really crafts that signature Dairy Queen texture. The whipped cream frosting is lighter because we control the ingredients. It’s about quality and freshness. This cake isn't just another dessert; it’s a labor of love that you’d be proud to share with loved ones.
Ingredients You'll Need
For the Cake:
- 2 quarts of freshly churned or softened classic vanilla ice cream
- 24 Oreo cookies, finely crushed
- 2 quarts of freshly churned or softened chocolate gelato
- 1 batch of homemade Hot Fudge Sauce, cooled to room temperature
For the Whipped Cream Frosting:
- 2 cups of heavy whipping cream
- 4 tablespoons of white sugar
- 2 teaspoons of pure vanilla extract
- 1 tablespoon of cocoa powder
Step by Step Directions
Step 1: Prepare Your Baking Dish
Start by grabbing a 9-inch springform pan. This pan is perfect because it allows for easy removal. Line the bottom with parchment paper and lightly grease the sides with cooking spray. That way, your layers will slide out smoothly when it’s time to serve.
Step 2: Create the First Layer
Spoon half of the vanilla ice cream into the prepared springform pan. Use a spatula to spread it evenly across the bottom. Smooth out the surface as best as you can.
Then, sprinkle half of the crushed Oreo cookies on top of the ice cream, pressing them down gently to secure them in place.
Step 3: Add the Chocolate Layer
Next, it’s time for the chocolate gelato. Spoon it over the Oreo layer, spreading it out evenly. Make sure to cover the cookies entirely.
Then, pour half of the cooled hot fudge sauce over the chocolate gelato layer, allowing it to drizzle enticingly into the crevices.
Step 4: Top It Off
Spoon the remaining vanilla ice cream on top, spreading it evenly. Finish with the remaining crushed Oreos and hot fudge sauce, ensuring a gorgeous finish.
Cover the cake with plastic wrap and stash it in the freezer for at least 4 hours, or ideally overnight. This allows it to set and create that perfect slice.
Step 5: Prepare the Whipped Cream Frosting
When you’re ready to unveil your masterpiece, whip the heavy cream in a mixing bowl. Start on low speed, gradually increasing until you're getting soft peaks. Add the sugar, vanilla extract, and cocoa powder while the mixer is still running. Beat until you achieve firm peaks.
Step 6: Frost the Cake
Remove your cake from the springform pan and place it on a serving platter. Use a spatula to frost the top and sides with whipped cream. Don’t worry about perfection; a swirled texture adds charm. If you're feeling fancy, use a piping bag for decorations.
Step 7: Chill and Serve
Return the cake to the freezer for another hour to set the frosting. When ready to serve, slice with a warm knife – it’ll cut through the layers beautifully. Now grab your forks and dive in!
Tips on Making Homemade Dairy Queen Ice Cream Cake
- Ice Cream Consistency: Allow your ice cream and gelato to soften at room temperature for 10-15 minutes before layering. Easier spreading leads to better layers.
- Layer Variety: Feel free to swap out flavors! Strawberry or mint chocolate chip can add exciting elements to your cake.
- Crust Option: For added texture, consider crushing graham crackers or using a cookie crust instead of layering Oreos.
- Hot Fudge Sauce: If you’re short on time, store-bought fudge sauce works well. But homemade adds a personal touch.
- Escape for a Moment: Don’t rush your freeze times! Allowing the cake to set longer creates a better final product.
How Can I Store This Homemade Dairy Queen Ice Cream Cake?
This ice cream cake stores beautifully in the freezer. If you have leftovers—lucky you! Cover it tightly with plastic wrap or aluminum foil. It will last for about 2 weeks, retaining its flavor and texture. Just remember to let it soften for 10 minutes before cutting.
Substitute Options for Ingredients
What if you're missing something? No problem! Here are some substitutes you can use:
- Ice Cream/Gelato: If you're out of vanilla or chocolate ice cream, frozen yogurt makes a great alternative. It's lighter and still creamy.
- Whipped Cream: You can substitute coconut cream if you're dairy-free. Chill a can overnight and whip it up for a delicious topping.
- Oreo Cookies: Not a fan of Oreos? Try Graham crackers or Chocolate wafer cookies for that delightful crunch.
- Heavy Cream: Cannot find heavy cream? Use milk and butter. Combine 3/4 cup of milk with 1/4 cup of melted butter to mimic its richness.
Conclusion
Homemade Dairy Queen ice cream cake is a nostalgic journey wrapped up in layers of flavor and joy.
The creamy, sweet layers are bound to bring smiles to your gatherings, while the simple preparation ensures that you enjoy more time with friends and family instead of being stuck in the kitchen.
You’ve got the flavors, the tips, and the tricks. Now it's your time to shine and create a masterpiece that could rival any store-bought cake.
So, grab your materials and let’s create a night of sweet memories! Enjoy every slice and make sure to share the love with those around you. Happy baking!
You’ll also like the following recipes!