Before diving deep into the world of homemade American cheese, let’s talk about what goes great with it. Think about creamy mac and cheese, gooey grilled cheese sandwiches, and delectable cheeseburgers. This cheese can elevate a range of dishes, making them richer and more fulfilling. Your palette will dance when paired with fresh bread, robust pickles, or even zesty jalapeños.
Now, picture this: gooey melted cheese drizzled over a slice of crusty bread, or dunked into a warm bowl of chili. That’s flavor harmony right there. Ready to learn how to make your own American cheese? I promise this hands-on adventure will be worth every minute.

What is DIY American Cheese?
In a nutshell, DIY American cheese is a homemade version of the processed cheese we often see in stores. Think of it as a blend of cheese and milk, whipped up into a creamy, meltable wonder. The beauty of making it yourself is that you control the ingredients. No additives, no preservatives, just pure, delicious cheese.
Why This Recipe Works
1. Control Over Ingredients
When I started making DIY American cheese, one major draw was ingredient control. You get to decide the quality of the cheese and milk you use. This means you can opt for organic or locally sourced products, ensuring no mystery ingredients made their way into your creation.
2. Unmatched Freshness
There’s something magical about food made from scratch. The flavor of homemade cheese is fresh and vibrant. You’ll notice a richness that often gets lost in mass production. Trust me, once you’ve tasted freshly made American cheese, store-bought options will just seem… lackluster.
3. Customizable Flavors
Don’t like smoked paprika? Want a kick of heat? You can alter the seasonings to fit your tastes. Whether you’re a heat aficionado or a fan of earthy spices, the choice is yours. Personally, I find a touch of garlic powder adds a delightful depth.
4. Satisfaction of Creation
There’s a sense of pride in making your own cheese. It’s not just about the taste; it’s about the journey. Each step is a beautiful dance, from melting to mixing and molding. Trust me when I say, you’ll feel like a cheese wizard by the end of it!
Ingredients You’ll Need to Make This Dish
To embark on your American cheese making journey, you’ll need the following simple ingredients:
- 12 ounces (340.2 g) Colby cheese, finely shredded (about 3 cups)
- ½ cup (122 ml) + 2 tablespoons whole milk
- 1 tablespoon warm water
- 1½ teaspoons plain gelatin
- 1 tablespoon whole milk powder
- 1 teaspoon kosher salt
- ¼ teaspoon smoked paprika (or your spice of choice)
- ½ teaspoon freshly cracked black pepper
These ingredients make up the foundation for a delightful cheese that will melt beautifully in your favorite dishes.

How To Make This DIY American Cheese
Now, let’s roll up our sleeves and get into the nitty-gritty of cheese-making. Follow these steps, and you’ll be on your way to creamy goodness!
Step 1: Gather Your Tools
Before anything else, make sure you have a double boiler or a heat-safe bowl over simmering water. This will help melt the cheese without burning it. Also, grab a whisk, measuring cups, and a blender for a smooth finish.
Step 2: Dissolve the Gelatin
In a small bowl, combine the warm water and gelatin. Let it sit for a couple of minutes until it becomes nice and gooey. This gelatin acts as a binder, giving our cheese that classic consistency.
Step 3: Combine Ingredients
In your double boiler, mix the Colby cheese, whole milk, milk powder, salt, paprika, and black pepper. Stir continuously over low heat. The goal here is to melt everything smoothly. Patience is key.
Step 4: Add the Gelatin Mixture
Once your cheese mixture is totally melted and creamy, add in the gelatin. Stir it in well to make sure it blends uniformly. This will help set the cheese as it cools.
Step 5: Blend for Smoothness
Transfer the melted cheese mixture to your blender. Blend for about a minute until the texture is silky smooth. This step is crucial for that perfect mouthfeel.
Step 6: Pour and Set
Pour the blended cheese into a mold or an airtight container. Allow it to cool at room temperature before placing it in the refrigerator. Let it chill for at least four hours, or overnight if you can resist.
Step 7: Enjoy Your Creation
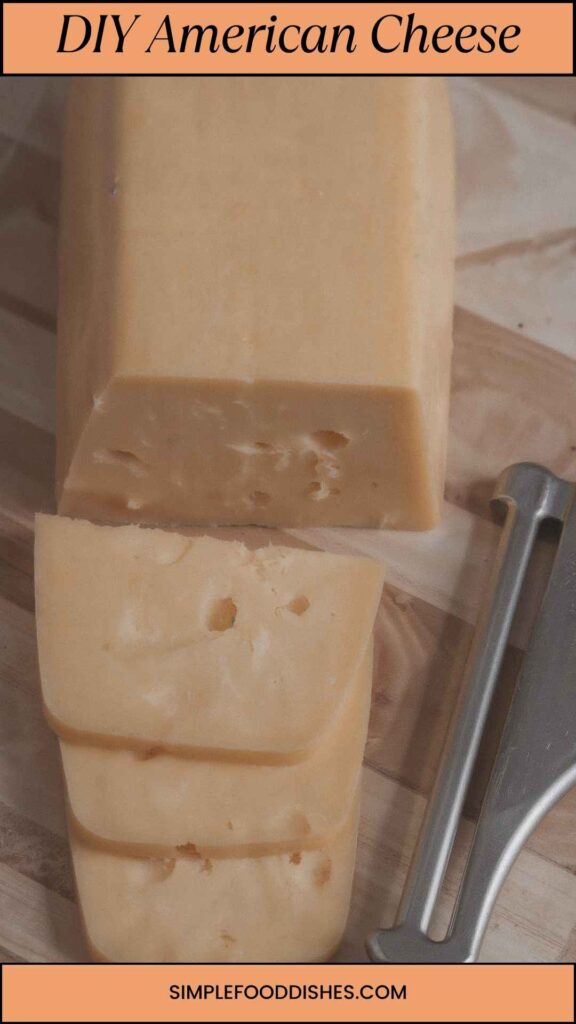
Once set, remove your DIY American cheese from the mold. Slice it, grate it, or melt it—whatever suits your culinary adventure. Enjoy the delightful cheese you made with your own hands!
Tips & Tricks
- Use a Food Processor: If you don’t have a blender, a food processor works great for achieving that smooth consistency.
- Experiment with Cheeses: While Colby is classic, mixing in cheddar can kick the flavor up a notch.
- Add Herbs: Fresh or dried herbs can bring a fresh twist to your cheese. Think basil or chives for added zest.
- Keep It Warm: Maintain low heat while melting your cheese. Hot, quick temperatures can lead to a grainy texture.
- Silicone Molds: If you’re using a mold, silicone is your best friend. It prevents sticking and makes removal easier.
Nutrition Information
Curious about what you’re getting with homemade cheese? Here’s a rough breakdown per serving, assuming the recipe yields about eight servings:
- Calories: 104
- Protein: 6g
- Fat: 8g (saturated fat includes)
- Carbohydrates: 2g
- Sodium: 200mg
Keep in mind, these values can vary based on the exact ingredients you choose.
How Do You Store The Leftovers?
Leftover American cheese can last up to two weeks in the fridge if stored properly. Keep it tightly wrapped in plastic wrap or in an airtight container to maintain freshness. You can also do a quick freezer stash. Just cut it into slices or blocks and wrap it securely. Thaw it in the fridge when you’re ready to use it again.
What Sides Would Complement DIY American Cheese?
Pairing your homemade cheese thoughtfully can create an unforgettable dining experience. Here are a few ideas:
1. Grilled Cheese Sandwiches
A classic choice. Use thick slices of bread and slather on butter for that perfect golden crunch. The gooey melted American cheese inside? Pure bliss.
2. Macaroni and Cheese
This comfort food staple shines with homemade cheese. It transforms your average mac into a creamy delight. Mix in some breadcrumbs on top for added texture.
3. Classic Cheeseburgers
What’s a burger without cheese? Melt a slice over your grilled beef patty and let that gooey goodness drench each bite. Toppings are infinite!
What Alternatives Can You Use For Ingredients If They Are Not Present In Your Kitchen?
You might find that some ingredients aren’t readily available. No worries—there are options.
1. Cheese Alternatives
If Colby isn’t your thing, try Monterey Jack or a mild cheddar. Each cheese brings its unique flavor while still melting wonderfully.
2. Milk Alternatives
Almond or oat milk can substitute whole milk, but check for unsweetened versions to avoid unwanted sweetness in your cheese.
3. Gelatin Substitutes
A vegetarian option would be agar-agar. It acts similarly, but keep in mind that you might need to tweak the quantities a bit.
4. Spices and Herbs
Feel free to play around! If you don’t have smoked paprika, a dash of cayenne can add heat; or try Italian herbs for a different experience.

Conclusion
Making DIY American cheese is rewarding, both in terms of taste and satisfaction. You control the quality and flavors, gaining a delicious addition to your culinary adventures. Whether you spread it on bread, melt it over pasta, or savor it by itself, the richness and flavor will impress anyone who takes a bite.
So, grab your ingredients, put on your favorite tunes, and get ready to embark on a cheesy journey. The next time you’re at a gathering, share your homemade cheese and watch everyone’s faces light up. Everyone loves a good homemade creation!
You’ll also like the following Recipes!

DIY American Cheese – Simple Food Dishes
Description
Who doesn’t love cheese? It’s versatile, comforting, and frankly, it can turn the simplest dish into a feast. American cheese might have its critics, but I’m here to tell you: when made from scratch, it’s a completely different story. When I first attempted to create my own American cheese, I thought I’d be stuck with a rubbery mess, but instead, what emerged was creamy, smooth, and absolutely delicious.
This DIY American cheese recipe is not just a fun way to flex your culinary muscles; it also opens doors to creativity in the kitchen. As a registered dietitian and food enthusiast, I prioritize wholesome, satisfying home-cooked meals. My kitchen adventures often lead to remarkable results worth sharing.
Ingredients
Instructions
Step 1: Gather Your Tools
-
Before anything else, make sure you have a double boiler or a heat-safe bowl over simmering water. This will help melt the cheese without burning it. Also, grab a whisk, measuring cups, and a blender for a smooth finish.
Step 2: Dissolve the Gelatin
-
In a small bowl, combine the warm water and gelatin. Let it sit for a couple of minutes until it becomes nice and gooey. This gelatin acts as a binder, giving our cheese that classic consistency.
Step 3: Combine Ingredients
-
In your double boiler, mix the Colby cheese, whole milk, milk powder, salt, paprika, and black pepper. Stir continuously over low heat. The goal here is to melt everything smoothly. Patience is key.
Step 4: Add the Gelatin Mixture
-
Once your cheese mixture is totally melted and creamy, add in the gelatin. Stir it in well to make sure it blends uniformly. This will help set the cheese as it cools.
Step 5: Blend for Smoothness
-
Transfer the melted cheese mixture to your blender. Blend for about a minute until the texture is silky smooth. This step is crucial for that perfect mouthfeel.
Step 6: Pour and Set
-
Pour the blended cheese into a mold or an airtight container. Allow it to cool at room temperature before placing it in the refrigerator. Let it chill for at least four hours, or overnight if you can resist.
Step 7: Enjoy Your Creation
-
Once set, remove your DIY American cheese from the mold. Slice it, grate it, or melt it—whatever suits your culinary adventure. Enjoy the delightful cheese you made with your own hands!
Nutrition Facts
Servings 1
- Amount Per Serving
- Calories 104kcal
- % Daily Value *
- Total Fat 8g13%
- Sodium 200mg9%
- Total Carbohydrate 2g1%
- Protein 6g12%
* Percent Daily Values are based on a 2,000 calorie diet. Your daily value may be higher or lower depending on your calorie needs.
Note
- Use a Food Processor: If you don’t have a blender, a food processor works great for achieving that smooth consistency.
- Experiment with Cheeses: While Colby is classic, mixing in cheddar can kick the flavor up a notch.
- Add Herbs: Fresh or dried herbs can bring a fresh twist to your cheese. Think basil or chives for added zest.
- Keep It Warm: Maintain low heat while melting your cheese. Hot, quick temperatures can lead to a grainy texture.
- Silicone Molds: If you’re using a mold, silicone is your best friend. It prevents sticking and makes removal easier.