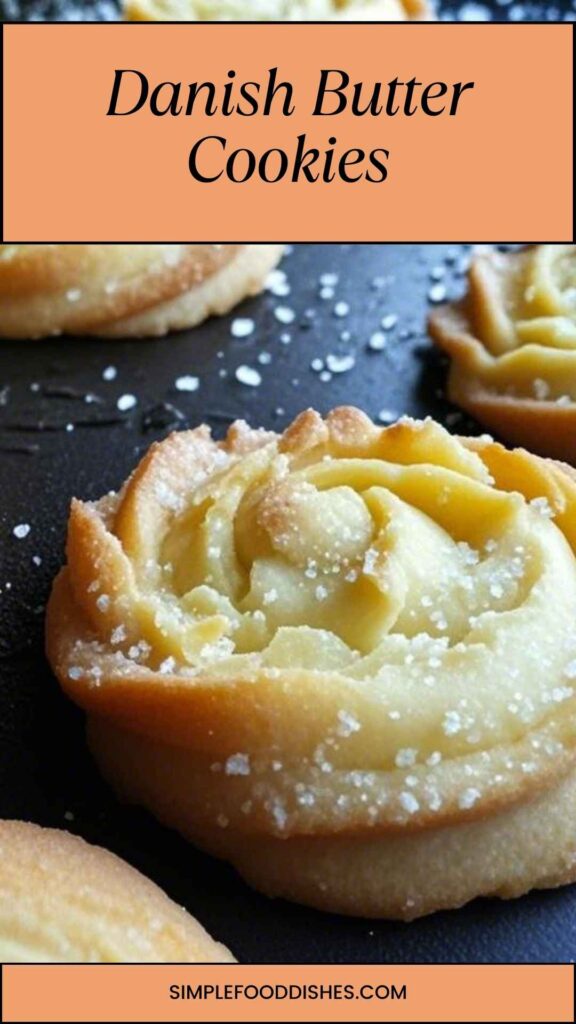
Ah, Danish butter cookies! Just saying the name conjures up images of warm kitchens filled with the irresistible scent of buttery baked goodness.
Growing up, I was often reminded of those delightful moments when a crisp tin filled with beautifully shaped cookies seemed to magically appear during the holidays. Each cookie, a masterpiece of buttery perfection, evoked fond memories of family gatherings.
Today, I want to share not just a recipe but the heartwarming journey of making Danish butter cookies that will transport you straight to that magical kitchen.

What are Danish Butter Cookies?
Danish butter cookies are more than just cookies; they are a cultural treasure of Denmark. These cookies are soft yet crunchy, rich in taste and simplicity.
Traditionally known as “Klejner,” they come in various shapes and are often adorned with cherry or chocolate. The use of high-quality ingredients like butter and sugar ensures that each bite is a celebration of flavor.
They often bring back memories of sharing with loved ones, making them a staple for celebrations and everyday joys alike.
Why You’ll Love These Danish Butter Cookies
Let’s be honest. Who wouldn’t love cookies that melt in your mouth? Danish butter cookies provide that heavenly crunch while maintaining a soft interior. The blending of sweet and salty makes them irresistible at any time of day.
Not to mention, they’re incredibly easy to make. You can bring them to a party or just enjoy them while lounging at home with a warm cup of tea.
Plus, they can be jazzed up with various flavors or toppings to suit your preferences.
The Ingredients
Before we can dive into the baking, let’s talk about what you’ll need. Here’s a list of core essentials for perfect Danish butter cookies:
- 1 cup sifted cake flour
- ½ cup unsalted butter, softened to room temperature
- ¼ teaspoon sea salt
- ½ cup confectioners’ sugar
- 1 teaspoon pure vanilla essence
- 1 tablespoon finely ground almond meal
Step-by-Step Instructions
Let’s roll up our sleeves and start baking! I promise, the process is straightforward and gratifying.
Step 1: Preheat Your Oven
Set your oven to 350°F (175°C). Preheating ensures that your cookies bake evenly.
Step 2: Cream the Butter and Sugar
In a mixing bowl, combine the softened butter and confectioners’ sugar. Beat them together until the mixture is light and fluffy. This usually takes about 2-3 minutes. Trust me, this step is crucial for that airy texture.
Step 3: Add Vanilla and Salt
Mix in the pure vanilla essence and the sea salt. This adds flavor that intensifies as the cookies bake.
Step 4: Incorporate the Flour and Almond Meal
Gradually sift in the cake flour and almond meal. Use a spatula or wooden spoon to fold the ingredients until just combined. Be gentle; overmixing can make the cookies tough, and nobody wants that!
Step 5: Shape the Cookies
Now, you can be as creative as you like! Use a piping bag for classic shapes or simply scoop rounded tablespoons onto a parchment-lined baking sheet. Leave some space between each cookie, as they will spread while baking.
Step 6: Bake to Perfection
Pop the sheet in the oven and bake for about 12-15 minutes. Keep an eye on them; you’re aiming for a light golden brown around the edges while the centers stay pale.
Step 7: Cool and Enjoy
Once baked, take them out and let them cool on a wire rack. Try not to eat them all at once; they taste even better after cooling.

Tips & Tricks
Baking is as much about precision as it is about creativity. Here are some tips to ensure your Danish butter cookies turn out fantastic:
- Use room-temperature butter: Cold butter does not incorporate well into the batter, leading to dense cookies.
- Don’t skip sifting: Ensure a lighter texture by incorporating air into the flour.
- Experiment with shapes: Use cookie cutters or a piping bag for fun shapes and designs.
- Chill the dough: If the dough feels too soft to handle, chill it for about 30 minutes.
- Customize: Feel free to add spices like cinnamon or citrus zest for a new flavor twist.
Can I Store Danish Butter Cookies?
Absolutely! Danish butter cookies can be stored in an airtight container at room temperature for up to two weeks.
If you’re looking to maintain their freshness, you can also freeze them for up to three months. Just ensure they are well-wrapped.
What Can I Serve with Danish Butter Cookies?
These cookies are versatile when it comes to pairing. A few ideas include:
- Coffee or Tea: Perfect for those afternoon breaks.
- Milk: The classic combo that never goes out of style.
- Ice Cream: Crushed cookies make for a delightful topping.
- Fruit Compote: Adds a burst of freshness.
Variations
While the classic rendition is simply divine, some variations can add a twist:
- Chocolate-Dipped: Melt some chocolate and dip half of each cookie. Let it set for an elegant touch.
- Lemon Zest Infusion: Add a teaspoon of lemon zest for a refreshing citrus flavor.
- Nutty Addition: Mix in finely chopped pecans or walnuts for delightful crunch.
- Cocoa Chocolate Chip: Swapping part of the flour for cocoa powder and adding chocolate chips for a rich alternative.
- Cinnamon Spice: Incorporate a teaspoon of cinnamon in the dough for a warm kick.

Conclusion
Danish butter cookies are more than just treats; they are a bridge between tradition and modern-day baking.
Making these cookies is a wonderful experience where simple ingredients come together to create something truly special. With a few tips and a little creativity, you can elevate your cookie game to a delightful level.
Next time you share these cookies, watch as hearts warm and smiles bloom.
So, let your kitchen fill with the scents of butter and sugar, and remember to enjoy the process as much as the result. Happy baking!
You’ll also like the following recipes!

Danish Butter Cookies – Simple Food Dishes
Description
Ah, Danish butter cookies! Just saying the name conjures up images of warm kitchens filled with the irresistible scent of buttery baked goodness.
Growing up, I was often reminded of those delightful moments when a crisp tin filled with beautifully shaped cookies seemed to magically appear during the holidays. Each cookie, a masterpiece of buttery perfection, evoked fond memories of family gatherings.
Ingredients
Instructions
Step 1: Preheat Your Oven
-
Set your oven to 350°F (175°C). Preheating ensures that your cookies bake evenly.
Step 2: Cream the Butter and Sugar
-
In a mixing bowl, combine the softened butter and confectioners’ sugar. Beat them together until the mixture is light and fluffy. This usually takes about 2-3 minutes. Trust me, this step is crucial for that airy texture.
Step 3: Add Vanilla and Salt
-
Mix in the pure vanilla essence and the sea salt. This adds flavor that intensifies as the cookies bake.
Step 4: Incorporate the Flour and Almond Meal
-
Gradually sift in the cake flour and almond meal. Use a spatula or wooden spoon to fold the ingredients until just combined. Be gentle; overmixing can make the cookies tough, and nobody wants that!
Step 5: Shape the Cookies
-
Now, you can be as creative as you like! Use a piping bag for classic shapes or simply scoop rounded tablespoons onto a parchment-lined baking sheet. Leave some space between each cookie, as they will spread while baking.
Step 6: Bake to Perfection
-
Pop the sheet in the oven and bake for about 12-15 minutes. Keep an eye on them; you’re aiming for a light golden brown around the edges while the centers stay pale.
Step 7: Cool and Enjoy
-
Once baked, take them out and let them cool on a wire rack. Try not to eat them all at once; they taste even better after cooling.
Nutrition Facts
Servings 14
- Amount Per Serving
- Calories 47kcal
- % Daily Value *
- Total Fat 0.2g1%
- Sodium 56mg3%
- Total Carbohydrate 10g4%
- Sugars 6g
- Protein 1g2%
* Percent Daily Values are based on a 2,000 calorie diet. Your daily value may be higher or lower depending on your calorie needs.
Note
- Use room-temperature butter: Cold butter does not incorporate well into the batter, leading to dense cookies.
- Don’t skip sifting: Ensure a lighter texture by incorporating air into the flour.
- Experiment with shapes: Use cookie cutters or a piping bag for fun shapes and designs.
- Chill the dough: If the dough feels too soft to handle, chill it for about 30 minutes.
- Customize: Feel free to add spices like cinnamon or citrus zest for a new flavor twist.