When it comes to bread, few varieties can claim the status that ciabatta holds. And why shouldn’t it?
The delightful mix of crusty exterior and chewy interior can elevate any meal. But before diving into the baking process, let’s talk about what you can pair this humble yet extraordinary bread with.
Ciabatta serves as a commendable base for a variety of toppings, making it a versatile companion in any meal. You could try it with bruschetta topped with ripe tomatoes, fresh basil, and a drizzle of balsamic glaze, or even slather on some rich goat cheese and honey for a divine snack.
If you’re feeling a bit heartier, consider crafting a sandwich packed with your favorite deli meats, cheese, and pickled veggies.
The texture of the bread will hold everything together beautifully. And let’s not forget a classic panini, where melted cheese and warm meats become one with that delightful crust. The possibilities are nearly endless!

What is Ciabatta Bread?
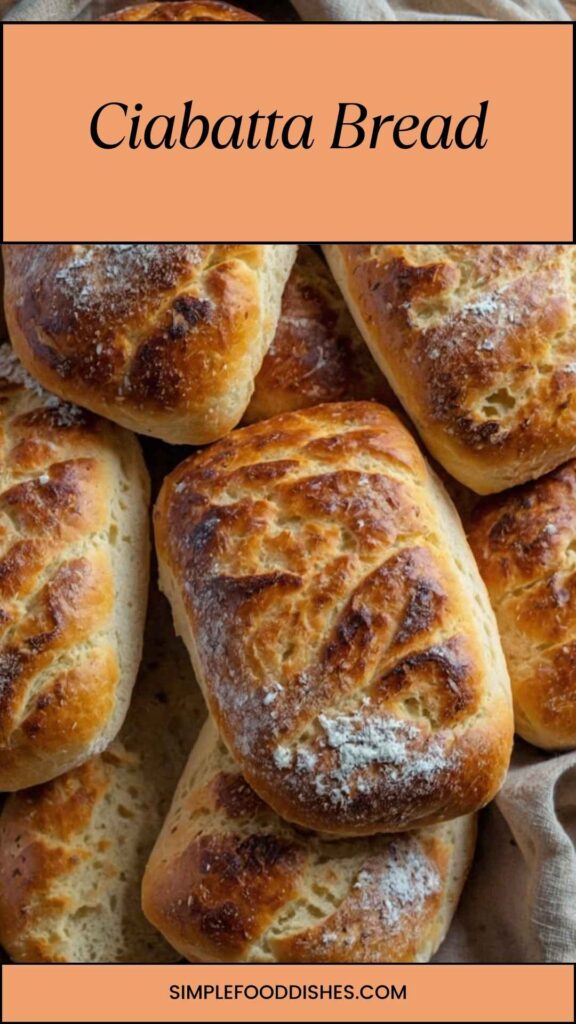
Ciabatta bread originates from Italy and is a staple in many Italian households. The name itself translates to “slipper,” attributed to its characteristic shape.
This bread is not your ordinary loaf; it features a crisp outer crust that encases a wonderfully airy and open crumb. What sets ciabatta apart from other types of bread is its production method, often using a biga, which is a type of preferment. This contributes to its distinctive flavor and texture.
You might wonder why ciabatta has gained such popularity over the years.
Its versatility allows for a myriad of uses, from sandwiches to soups, and its rustic appearance makes it a hit at gatherings. Trust me, when you bake ciabatta at home, you’ll feel like a proud Italian nonna.
Why This Recipe Works
This ciabatta recipe works because of the inclusion of a biga. By allowing some of the dough to ferment overnight, you develop complex flavors and improve the bread’s texture.
The longer fermentation time enhances the gluten development, resulting in a chewy, tasty loaf that is a far cry from store-bought varieties.
Moreover, using high-protein bread flour ensures that the dough will rise properly and maintain its structure. Combine this with the right hydration level, and you’re well on your way to baking success.
Each step of the process, from mixing to baking, contributes to that signature crumb and crust that makes ciabatta distinctive.
What You’ll Need to Make This Dish?
Before we roll up our sleeves, let’s gather the ingredients. Here’s what you need for a classic ciabatta:
Biga/Preferment
- 1/8 teaspoon instant or active-dry yeast
- 1/2 cup lukewarm water (around 70°F or 21°C)
- 1 cup all-purpose bread flour
Ciabatta Rolls
- 1 teaspoon instant or active-dry yeast
- 1 and 1/2 teaspoons kosher salt
- 2 tablespoons extra virgin olive oil
- 2 and 1/2 cups high-protein bread flour, extra flour for dusting
- 1 cup warm water (approximately 100–110°F or 38°–43°C)
- 1 tablespoon honey
- 1/2 teaspoon garlic powder

How to Make Ciabatta Bread?
In a nutshell, making ciabatta involves a few essential steps. You’ll begin by creating the biga, allowing it to ferment overnight.
This is followed by mixing together your main dough ingredients, shaping the dough, letting it rise, and finally baking it until golden brown.
Now, let’s dive into each step in detail.
Step 1: Prepare the Biga
Start by combining your yeast and water in a bowl. Stir in the flour until no dry patches remain. Cover the bowl with plastic wrap and let it sit at room temperature for 12 to 16 hours.
This longer fermentation process gives ciabatta its distinctive flavor.
Step 2: Mixing the Dough
Once your biga is ready, grab a large mixing bowl. Combine the yeast, honey, and warm water. Stir until the yeast dissolves.
Add the biga and mix until combined. In a separate bowl, whisk together the bread flour and kosher salt. Gradually add the flour mixture to the liquid until a rough dough forms.
Step 3: Kneading the Dough
Transfer your dough to a well-floured surface. Using floured hands, incorporate additional flour as necessary, kneading for about 8 to 10 minutes. The dough should become smooth and elastic, but also somewhat sticky. This is expected for ciabatta’s unique texture.
Step 4: First Rise
Shape your dough into a ball and place it in a lightly oiled bowl. Cover with a damp cloth. Allow it to rise in a warm spot for approximately 1 to 2 hours, or until it doubles in size.
Step 5: Shaping the Dough
Once your dough has risen, turn it out onto a floured surface. divis it into two equal pieces. Gently stretch each piece into a rectangle, being careful not to deflate the air bubbles.
Step 6: Second Rise
Dust a baking sheet with flour or line it with parchment paper. Place the shaped dough pieces on the tray, ensuring enough space between them.
Cover with a kitchen towel and allow them to rise for an additional 30 to 45 minutes.
Step 7: Preheat the Oven
Preheat your oven to 450°F (232°C). Place a baking stone or an inverted baking sheet in the oven to heat up. This will help create a crispy crust.
Step 8: Baking
Before placing the dough in the oven, add a shallow pan filled with hot water to create steam. Carefully transfer your ciabatta loaves onto the heated baking stone.
Bake for about 20 to 25 minutes or until they are golden brown and sound hollow when tapped on the bottom.
Step 9: Cooling
Once baked, remove the loaves from the oven. Let them cool on a wire rack for at least 30 minutes before slicing. This resting period is crucial for the texture.
Tips
- Hydration Matters: Ciabatta dough is wetter than regular bread. Don’t be tempted to add too much flour; it’s essential for that chewy texture.
- Use High-Quality Flour: Opt for high-protein bread flour. It contributes to the strength of the dough and improves the rise.
- Watch the Oven Temperature: Make sure your oven is fully preheated. A well-heated oven ensures a crispy crust.
- Don’t Rush the Fermentation: Allowing enough time for your biga to ferment is vital. This enhances flavor and texture.
- Experiment with Flavors: Feel free to add herbs or garlic powder for added flavor. Ciabatta is highly versatile!
How to Store Leftovers?
If you find yourself with leftover ciabatta, don’t fret. The right storage will keep it fresh. Wrap the bread in a clean kitchen towel and place it in a paper bag.
This allows it to breathe without getting stale too quickly. Store at room temperature for up to three days.
If you want to keep it longer, consider freezing it. Slice the bread and wrap it tightly in plastic wrap, then place it in a freezer-safe bag.
It should be good for up to three months. When ready to enjoy, just thaw it at room temperature or pop it in the oven for a quick refresh.
How Would I Recommend Serving Ciabatta Bread?
When it comes to enjoying this tasty bread, there are many delicious ways to serve ciabatta. Here are my top recommendations:
- Bruschetta: Top your toasted ciabatta slices with a mixture of diced tomatoes, fresh basil, olive oil, and balsamic vinegar. A sprinkle of salt elevates it further. It’s a refreshing appetizer, perfect for summer evenings.
- Sandwiches: Layer your favorite deli meats, cheeses, and crunchy veggies between two slices of ciabatta. The bread’s sturdiness holds up well against moist ingredients. A classic turkey and cheddar or a veggie delight work wonders.
- Panini: Grill slices of ciabatta with mozzarella, pesto, and sun-dried tomatoes for a delicious panini. The bread crisps up nicely, creating a hearty meal great for lunch or dinner.
- Sop Up Soups: Serve ciabatta alongside a bowl of hearty soup or stew. Tear off a piece and use it to soak up every last drop. It’s a comforting way to enjoy both bread and soup.
What Alternatives Can You Use for the Ingredients if Not Available?
If you find yourself short on any of the original ingredients, fear not! There are always alternatives:
- All-Purpose Flour: If bread flour is unavailable, you can use all-purpose flour. However, your ciabatta may be slightly less chewy.
- Honey: Need a substitute? Maple syrup or agave nectar can replace honey. They will provide a similar sweetness.
- Active-dry Yeast: If you’re out of instant yeast, you can use active-dry yeast. Just remember to activate it in warm water before adding.
- Garlic Powder: Missing garlic powder? Fresh minced garlic can be used instead. Just a little will add that delightful garlic flavor we all love.

Conclusion
Making ciabatta bread is not just about following a recipe; it’s an adventure in taste and texture. The process comes with rewards beyond the delicious end product.
Whether you’re enjoying it with a savory spread, making a mouth-watering sandwich, or just tearing off pieces to dip in soup, ciabatta bread adds a special touch to any meal.
So, roll up your sleeves, gather those ingredients, and embark on your own ciabatta-making journey. The taste of homemade bread, straight from the oven, is something every home chef should experience. Enjoy every slice!
You’ll also like the following recipes!

Ciabatta Bread – Simple Food Dishes
Description
I still remember the first time I took a bite of freshly baked ciabatta. It wasn’t just bread; it was an experience that drew me in with its crispy crust and soft, airy interior.
As a food enthusiast, I’ve experimented with countless recipes, but ciabatta holds a special place in my heart. It’s simple yet brilliant, and the process of making it is just as rewarding as the final product.
In this post, we’ll explore everything you need to know about ciabatta bread—from its history and what makes it unique to step-by-step instructions for making your own. Buckle up as we embark on this delicious adventure.
Ingredients
Biga/Preferment
Ciabatta Rolls
Instructions
Step 1: Prepare the Biga
-
Start by combining your yeast and water in a bowl. Stir in the flour until no dry patches remain. Cover the bowl with plastic wrap and let it sit at room temperature for 12 to 16 hours.
This longer fermentation process gives ciabatta its distinctive flavor.
Step 2: Mixing the Dough
-
Once your biga is ready, grab a large mixing bowl. Combine the yeast, honey, and warm water. Stir until the yeast dissolves.
Add the biga and mix until combined. In a separate bowl, whisk together the bread flour and kosher salt. Gradually add the flour mixture to the liquid until a rough dough forms.
Step 3: Kneading the Dough
-
Transfer your dough to a well-floured surface. Using floured hands, incorporate additional flour as necessary, kneading for about 8 to 10 minutes. The dough should become smooth and elastic, but also somewhat sticky. This is expected for ciabatta's unique texture.
Step 4: First Rise
-
Shape your dough into a ball and place it in a lightly oiled bowl. Cover with a damp cloth. Allow it to rise in a warm spot for approximately 1 to 2 hours, or until it doubles in size.
Step 5: Shaping the Dough
-
Once your dough has risen, turn it out onto a floured surface. divis it into two equal pieces. Gently stretch each piece into a rectangle, being careful not to deflate the air bubbles.
Step 6: Second Rise
-
Dust a baking sheet with flour or line it with parchment paper. Place the shaped dough pieces on the tray, ensuring enough space between them.
Cover with a kitchen towel and allow them to rise for an additional 30 to 45 minutes.
Step 7: Preheat the Oven
-
Preheat your oven to 450°F (232°C). Place a baking stone or an inverted baking sheet in the oven to heat up. This will help create a crispy crust.
Step 8: Baking
-
Before placing the dough in the oven, add a shallow pan filled with hot water to create steam. Carefully transfer your ciabatta loaves onto the heated baking stone.
Bake for about 20 to 25 minutes or until they are golden brown and sound hollow when tapped on the bottom.
Step 9: Cooling
-
Once baked, remove the loaves from the oven. Let them cool on a wire rack for at least 30 minutes before slicing. This resting period is crucial for the texture.
Nutrition Facts
Servings 8
- Amount Per Serving
- Calories 230kcal
- % Daily Value *
- Total Fat 20.9g33%
- Saturated Fat 2.9g15%
- Sodium 383mg16%
- Total Carbohydrate 9g3%
- Dietary Fiber 1g4%
- Sugars 1g
- Protein 2g4%
* Percent Daily Values are based on a 2,000 calorie diet. Your daily value may be higher or lower depending on your calorie needs.
Note
- Hydration Matters: Ciabatta dough is wetter than regular bread. Don't be tempted to add too much flour; it's essential for that chewy texture.
- Use High-Quality Flour: Opt for high-protein bread flour. It contributes to the strength of the dough and improves the rise.
- Watch the Oven Temperature: Make sure your oven is fully preheated. A well-heated oven ensures a crispy crust.
- Don’t Rush the Fermentation: Allowing enough time for your biga to ferment is vital. This enhances flavor and texture.
- Experiment with Flavors: Feel free to add herbs or garlic powder for added flavor. Ciabatta is highly versatile!