Ah, red velvet cheesecake. Just saying it makes my taste buds tingle! This dessert is not only a feast for the eyes but also a delight for the palate. If you’ve ever had the chance to enjoy this velvety treat, you know exactly what I’m talking about.
In this blog post, I’m inviting you to join me on a journey into the world of no bake red velvet cheesecake. This is your opportunity to create something stunning, delicious, and, best of all, easy to make! So, roll up your sleeves and let’s dive in.

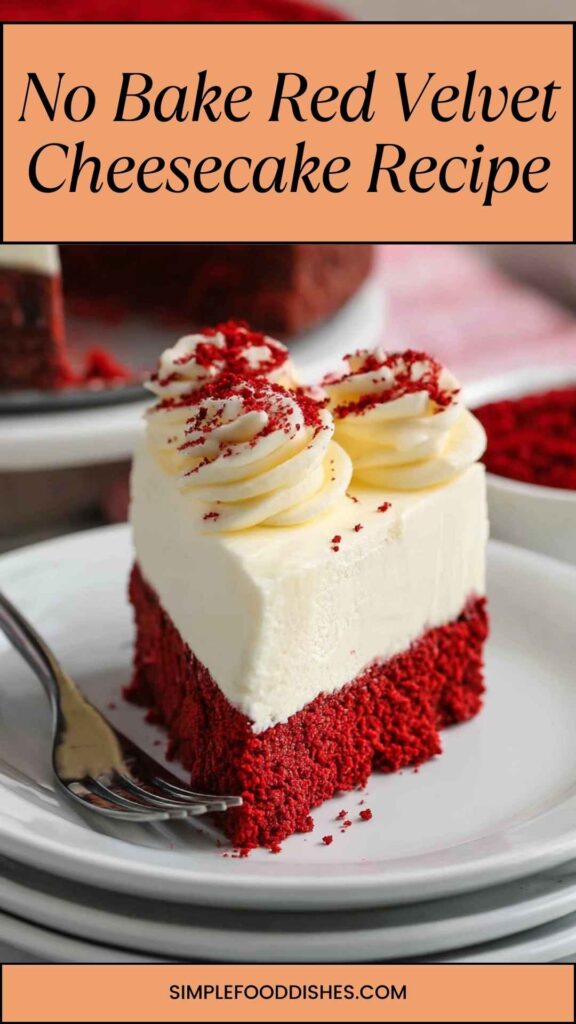
What is No Bake Red Velvet Cheesecake?
In its simplest form, no bake red velvet cheesecake combines the rich, bold flavors of traditional red velvet cake with the creamy goodness of cheesecake. The beauty of the no bake version lies in its simplicity.
You don’t have to deal with an oven! Instead, it relies on the magic of chilling to set the cake into a sliceable dessert. This particular dessert is layered with a decadent cheesecake filling that is accented by the unmistakable red hue and subtle cocoa flavor of red velvet cake.
Why You’ll Love This No Bake Red Velvet Cheesecake
Let’s face it: desserts that require no baking are a lifesaver, especially during hot months when the last thing you want is to crank up the oven. This no bake red velvet cheesecake is for anyone who appreciates quick, gratifying sweets. Beyond its ease of preparation, it combines alluring flavors with a striking appearance, making it a conversation starter at any gathering.
The smooth, velvety texture contrasts beautifully with the light, fluffy filling. Each bite offers just the right sweetness, and if you add whipped cream and fresh raspberries, it creates a masterpiece that stands out on any table.
The Ingredients
Here’s what you’ll need to whip up this beauty.
Red Velvet Cake
- 1 large egg
- ½ cup canola oil
- ⅓ cup whole milk
- 15 ¾ ounces red velvet cake mix (1 package)
No Bake Cheesecake
- 1 ½ cups heavy cream
- 12 ounces cream cheese (softened)
- 1 ½ cups confectioners’ sugar
- 1 teaspoon pure vanilla extract
Optional
- Sweetened whipped cream and fresh raspberries for garnish
- 1 tablespoon cocoa powder
- 1 tablespoon lemon juice
These ingredients may seem straightforward, but each one plays a part in creating magic.

Step by Step Instructions
Let’s get those hands dirty! Here’s how to make this dreamy no bake red velvet cheesecake.
Step 1: Prepare the Red Velvet Cake
First things first, preheat your oven to 350°F (175°C).
- In a bowl, mix the red velvet cake mix, egg, canola oil, and milk.
- Stir until everything is well combined. Make sure there are no lumps; it should be a smooth, beautiful mix.
- Pour this mix into a greased cake pan, and bake it for about 25 minutes.
While that cake is baking, let’s move on to the cheesecake filling.
Step 2: Make the Cream Cheese Filling
- In a large bowl, beat the softened cream cheese until it’s smooth and creamy.
- Gradually add the confectioners’ sugar, whisking until incorporated.
- Next, pour in the heavy cream and continue to whisk until it reaches a fluffy consistency.
- Stir in the vanilla extract, cocoa powder, and lemon juice until everything is well mixed together.
Step 3: Assemble the Cheesecake
Once your cake has fully cooled, it’s time to create layers!
- Cut the cooled red velvet cake into small cubes or slices.
- In an 8-inch springform pan, layer half of the red velvet cake at the bottom.
- Pour half of the cream cheese mixture over the cake layer, spreading it evenly.
- Repeat the process with the remaining cake and cream cheese.
Step 4: Chill Your Cheesecake
Cover the springform pan with plastic wrap and refrigerate for at least 4 hours, or ideally overnight. This chilling time allows the cheesecake to firm up and for the flavors to meld together beautifully.
Step 5: Serve and Enjoy
When ready to serve, carefully remove the cheesecake from the springform pan. Top with whipped cream and fresh raspberries, if desired. Slice, serve, and watch as everyone devours your labor of love!
Tips & Tricks
Here are some tips to make your no bake red velvet cheesecake an absolute winner:
- Use Room Temperature Ingredients: Allow the cream cheese to soften for easy mixing. This ensures a smooth filling.
- Chill Thoroughly: Don’t skimp on chill time. The longer it sets, the better it will be.
- Decorate Creatively: Add chocolate shavings or crushed cookies for extra flair on top.
- Make it Ahead of Time: Preparing it the day before serving allows the flavors to integrate.
- Experiment with Flavors: Don’t hesitate to try different extracts or toppings for a personal twist!
Can I Store No Bake Red Velvet Cheesecake?
Absolutely! Store leftover no bake red velvet cheesecake in an airtight container in the refrigerator. It will stay fresh for up to 5-7 days.
If you want to keep it longer, consider freezing slices. Wrap them tightly in plastic wrap and then in foil. To enjoy, simply thaw in the refrigerator overnight.
What Can I Serve with No Bake Red Velvet Cheesecake?
Pair this dessert with a range of delightful options!
- Fresh Fruits: Berries or sliced bananas can add a refreshing contrast.
- Coffee or Tea: The rich flavors of coffee or a soothing tea balance the sweetness perfectly.
- Chocolate Sauce: Drizzle some chocolate on top for a double treat.
- Ice Cream: A scoop of vanilla or mint ice cream never goes amiss!
- Other Desserts: Serve alongside cookies or brownies for a dessert spread.
Variations
If you want to get creative, here are some variations to consider:
- Red Velvet Cheesecake Cups: Layer crumbly cake and filling in individual cups. Perfect for parties!
- Chocolate Drizzle: Add a chocolate ganache drizzle on top for a richer flavor.
- Nutty Twist: Stir in some finely chopped nuts into the cheesecake filling for an added crunch.
- Berry Bliss: Incorporate mixed berries into the filling for a fruity burst.
- Cheesecake Bites: Make bite-sized versions by forming the mixture into balls and coating them in chocolate.

Conclusion
If you’ve made it this far, congratulations! You’ve just embarked on an exciting culinary adventure. The no bake red velvet cheesecake is not just a treat; it’s an experience filled with flavors, textures, and memories waiting to be shared with friends and family.
Whether it’s a special occasion or just a day that calls for something sweet, this dessert ticks all the boxes.
So, go ahead and whip up this delightful cheesecake. You will savor every bite and maybe even inspire others to give it a try.
Trust me, once you make this, you’ll want to share the recipe—and the memories will surely come rushing back with every taste! Enjoy your cheesecake journey!
You’ll also like the following recipes!
- Soft And Fluffy White Bread Copycat Recipe
- How to Make Old Fashioned Bread And Butter Pickles
- Best Simple Dutch Apple Pie Recipe

No Bake Red Velvet Cheesecake Recipe – Simple Food Dishes
Description
Ah, red velvet cheesecake. Just saying it makes my taste buds tingle! This dessert is not only a feast for the eyes but also a delight for the palate. If you’ve ever had the chance to enjoy this velvety treat, you know exactly what I’m talking about.
Ingredients
Red Velvet Cake
No Bake Cheesecake
Instructions
Step 1: Prepare the Red Velvet Cake
-
First things first, preheat your oven to 350°F (175°C).
- In a bowl, mix the red velvet cake mix, egg, canola oil, and milk.
- Stir until everything is well combined. Make sure there are no lumps; it should be a smooth, beautiful mix.
- Pour this mix into a greased cake pan, and bake it for about 25 minutes.
While that cake is baking, let’s move on to the cheesecake filling.
- In a bowl, mix the red velvet cake mix, egg, canola oil, and milk.
Step 2: Make the Cream Cheese Filling
-
- In a large bowl, beat the softened cream cheese until it's smooth and creamy.
- Gradually add the confectioners' sugar, whisking until incorporated.
- Next, pour in the heavy cream and continue to whisk until it reaches a fluffy consistency.
- Stir in the vanilla extract, cocoa powder, and lemon juice until everything is well mixed together.
- In a large bowl, beat the softened cream cheese until it's smooth and creamy.
Step 3: Assemble the Cheesecake
-
Once your cake has fully cooled, it’s time to create layers!
- Cut the cooled red velvet cake into small cubes or slices.
- In an 8-inch springform pan, layer half of the red velvet cake at the bottom.
- Pour half of the cream cheese mixture over the cake layer, spreading it evenly.
- Repeat the process with the remaining cake and cream cheese.
- Cut the cooled red velvet cake into small cubes or slices.
Step 4: Chill Your Cheesecake
-
Cover the springform pan with plastic wrap and refrigerate for at least 4 hours, or ideally overnight. This chilling time allows the cheesecake to firm up and for the flavors to meld together beautifully.
Step 5: Serve and Enjoy
-
When ready to serve, carefully remove the cheesecake from the springform pan. Top with whipped cream and fresh raspberries, if desired. Slice, serve, and watch as everyone devours your labor of love!
Nutrition Facts
Servings 12
- Amount Per Serving
- Calories 493kcal
- % Daily Value *
- Total Fat 23.8g37%
- Saturated Fat 9.6g48%
- Cholesterol 62mg21%
- Sodium 536mg23%
- Total Carbohydrate 65g22%
- Dietary Fiber 1g4%
- Sugars 47g
- Protein 7g15%
* Percent Daily Values are based on a 2,000 calorie diet. Your daily value may be higher or lower depending on your calorie needs.
Note
- Use Room Temperature Ingredients: Allow the cream cheese to soften for easy mixing. This ensures a smooth filling.
- Chill Thoroughly: Don't skimp on chill time. The longer it sets, the better it will be.
- Decorate Creatively: Add chocolate shavings or crushed cookies for extra flair on top.
- Make it Ahead of Time: Preparing it the day before serving allows the flavors to integrate.
- Experiment with Flavors: Don't hesitate to try different extracts or toppings for a personal twist!