Have you ever bitten into a cupcake that instantly took you back to your childhood? That’s how I feel about red velvet cupcakes with cream cheese frosting.
The vibrant color and that unique, tangy taste always bring back memories of joyful celebrations and hearty laughter. And if you pair it with a warm cup of coffee or a refreshing glass of milk, it becomes even more delightful.
In my experience, there’s no better match than a classic red velvet cupcake on a bright afternoon when friends stop by unexpectedly.
It’s that perfect treat that invites everyone in, sparking conversations and smiles.

What is Red Velvet Cupcakes Cream Cheese Frosting?
Let’s break it down.
Red velvet cupcakes are a type of cake that holds a perfect spot between chocolate and vanilla. They’re vibrant, soft, and rich—definitely a crowd-pleaser. The cream cheese frosting on top?
Oh, that’s the star of the show! It’s smooth, slightly tangy, and perfectly balances the sweetness of the cupcake. Together, they create a harmonious bite that’s utterly irresistible.
The Ingredients
To create these delightful cupcakes and their luscious frosting, you’ll need a handful of simple yet essential ingredients. Here’s what you’ll need:
Cupcake Ingredients:
1 1/2 cups granulated sugar
2 1/2 cups sifted cake flour
1/2 cup unsalted butter, softened to room temperature
2 tablespoons unsweetened cocoa powder
2 large eggs, room temperature
1 teaspoon baking powder
1 teaspoon baking soda
1 teaspoon apple cider vinegar
1 teaspoon pure vanilla extract
1/2 teaspoon salt
1 cup buttermilk, warmed slightly
2 oz. red gel food coloring
1 teaspoon espresso powder
1/2 teaspoon almond extract
Cream Cheese Frosting Ingredients:
4 cups powdered sugar, sifted
1 lb cream cheese, softened
1 stick (1/2 cup) unsalted butter, softened
1 teaspoon lemon zest
1 tablespoon vanilla extract

How to Make Red Velvet Cupcakes with Cream Cheese Frosting
As I delve into this recipe, I find that it’s more than just baking; it’s a comforting and rewarding experience.
You’ll find that making these decadent cupcakes involves a series of enjoyable steps that keep you engaged and excited.
Let’s embark on this baking adventure together!
Step 1: Prepare the Oven and Cupcake Liners
Preheat your oven to 350°F (175°C). While that’s warming up, line your cupcake tin with paper liners. Trust me; it makes the cleanup incredibly easy, and it gives each cupcake its very own cozy bed.
Step 2: Mix the Dry Ingredients
In a mixing bowl, combine 2 1/2 cups of sifted cake flour, 1 1/2 cups of granulated sugar, 2 tablespoons of cocoa powder, 1 teaspoon of baking powder, 1 teaspoon of baking soda, and 1/2 teaspoon of salt.
Whisk these together until they’re well blended. This step is crucial for ensuring that your cupcakes rise evenly and develop a delightful texture.
Step 3: Combine the Wet Ingredients
In another bowl, cream together 1/2 cup of softened unsalted butter.
Add in the 2 large eggs, 1 teaspoon of vanilla extract, 1 teaspoon of apple cider vinegar, and 1 cup of buttermilk that’s been warmed slightly. Beat it until everything is well combined and smooth.
If you’re feeling adventurous, toss in 1 teaspoon of espresso powder for an extra depth of flavor.
Step 4: The Red Magic
Now, it’s time to add the red gel food coloring. Mix in 2 oz. of the red gel into your wet ingredients. This will give your batter that signature color.
Step 5: Combine Wet and Dry Mixtures
Slowly add the dry mixture to your wet ingredients, mixing gently. Be cautious not to overmix; you want your cupcakes to be light and fluffy, not dense!
Step 6: Fill and Bake
Using an ice cream scoop or a spoon, fill each cupcake liner about two-thirds full with the batter. Bake in your preheated oven for about 20-22 minutes. The aroma wafting through your kitchen will make your mouth water.
Step 7: Cool the Cupcakes
Once they are baked, allow the cupcakes to cool in the tin for around 5 minutes. After that, transfer them to a wire rack to cool completely. This is the crucial waiting period—try not to sneak any bites just yet.
Step 8: Make the Cream Cheese Frosting
While waiting, let’s whip up the frosting. In a large bowl, beat together 1 lb of softened cream cheese and 1 stick of softened unsalted butter until creamy and smooth.
Gradually add in 4 cups of sifted powdered sugar while beating. Finally, mix in 1 tablespoon of vanilla extract and 1 teaspoon of lemon zest for a subtle zing.
Step 9: Frost the Cupcakes
Once your cupcakes have cooled completely, it’s time for the fun part!
Using a piping bag or a simple spatula, generously frost each cupcake with your cream cheese mixture. A little swirl always adds charm!
Notes
Here are some tips to enhance your baking experience:
- Use Gel Food Coloring: It gives a more vibrant color and doesn’t alter the batter’s consistency.
- Room Temperature Ingredients: Use eggs and butter at room temperature for easier mixing.
- Don’t Overmix: Gently fold the batter to keep it airy.
- Piping Tips: Experiment with different piping tips for beautiful frosting designs.
- Chill the Frosting: If it gets too soft, refrigerate your cream cheese frosting for a short while before decorating.
Storage Tips
Store any leftover cupcakes in an airtight container in the refrigerator. They should last for 3-5 days, although they may not even last that long!
You can also freeze the cupcakes without frosting for up to 3 months. Just wrap them tightly in plastic wrap and aluminum foil.
Serving Suggestions
- Coffee Pairing: Enjoy these cupcakes with a strong cup of coffee. The bittersweet taste complements the creaminess perfectly.
- Milk Lovers Delight: Serve with a glass of cold milk. The refreshing contrast balances the sweetness of the cupcake.
- Ice Cream Sandwiches: Try using two cupcakes with a scoop of vanilla ice cream in between. Instant dessert gratification!
- Decorative Touch: Add sprinkles or crushed nuts on top of the frosting for a fun texture and visual appeal.
- Celebrate With Friends: These cupcakes are perfect for birthdays or gatherings. Share them at your next event for ultimate crowd-pleasing sweetness.
What Other Substitutes Can I Use in Red Velvet Cupcakes with Cream Cheese Frosting?
- Buttermilk Substitutes: If you don’t have buttermilk, mix 1 cup of milk with 1 tablespoon of lemon juice or vinegar. Let it sit for 10 minutes to curdle.
- Vegetable Oil Instead of Butter: Substitute melted butter with an equal amount of vegetable oil for a lighter texture.
- Cream Cheese Alternatives: You could use mascarpone cheese for a different flavor in your frosting.
- Gluten-Free Option: Use a 1:1 gluten-free flour blend instead of regular cake flour for a gluten-free version.
- Non-Dairy Option: Use coconut cream instead of regular cream cheese for a dairy-free frosting alternative.

Conclusion
Creating red velvet cupcakes with cream cheese frosting is more than just following a recipe; it’s about embracing the joy of baking. It transports you to a delightful place where each bite generates smiles.
Whether you’re sharing them with friends or treating yourself, these cupcakes remind us of sweeter moments in life. So gather your ingredients, pour on the love, and let’s bake together!
You’ll also like the following recipes!
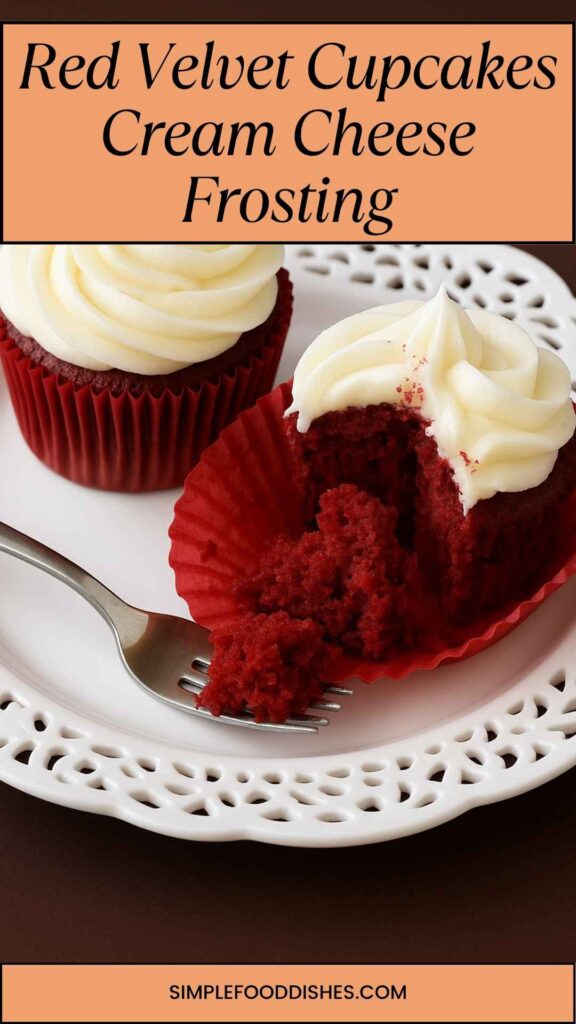

Red Velvet Cupcakes Cream Cheese Frosting – Simple Food Dishes
Description
Have you ever bitten into a cupcake that instantly took you back to your childhood? That’s how I feel about red velvet cupcakes with cream cheese frosting.
The vibrant color and that unique, tangy taste always bring back memories of joyful celebrations and hearty laughter. And if you pair it with a warm cup of coffee or a refreshing glass of milk, it becomes even more delightful.
Ingredients
Cupcake Ingredients:
Cream Cheese Frosting Ingredients:
Instructions
Step 1: Prepare the Oven and Cupcake Liners
-
Preheat your oven to 350°F (175°C). While that’s warming up, line your cupcake tin with paper liners. Trust me; it makes the cleanup incredibly easy, and it gives each cupcake its very own cozy bed.
Step 2: Mix the Dry Ingredients
-
In a mixing bowl, combine 2 1/2 cups of sifted cake flour, 1 1/2 cups of granulated sugar, 2 tablespoons of cocoa powder, 1 teaspoon of baking powder, 1 teaspoon of baking soda, and 1/2 teaspoon of salt.
Whisk these together until they’re well blended. This step is crucial for ensuring that your cupcakes rise evenly and develop a delightful texture.
Step 3: Combine the Wet Ingredients
-
In another bowl, cream together 1/2 cup of softened unsalted butter.
Add in the 2 large eggs, 1 teaspoon of vanilla extract, 1 teaspoon of apple cider vinegar, and 1 cup of buttermilk that’s been warmed slightly. Beat it until everything is well combined and smooth.
If you’re feeling adventurous, toss in 1 teaspoon of espresso powder for an extra depth of flavor.
Step 4: The Red Magic
-
Now, it’s time to add the red gel food coloring. Mix in 2 oz. of the red gel into your wet ingredients. This will give your batter that signature color.
Step 5: Combine Wet and Dry Mixtures
-
Slowly add the dry mixture to your wet ingredients, mixing gently. Be cautious not to overmix; you want your cupcakes to be light and fluffy, not dense!
Step 6: Fill and Bake
-
Using an ice cream scoop or a spoon, fill each cupcake liner about two-thirds full with the batter. Bake in your preheated oven for about 20-22 minutes. The aroma wafting through your kitchen will make your mouth water.
Step 7: Cool the Cupcakes
-
Once they are baked, allow the cupcakes to cool in the tin for around 5 minutes. After that, transfer them to a wire rack to cool completely. This is the crucial waiting period—try not to sneak any bites just yet.
Step 8: Make the Cream Cheese Frosting
-
While waiting, let’s whip up the frosting. In a large bowl, beat together 1 lb of softened cream cheese and 1 stick of softened unsalted butter until creamy and smooth.
Gradually add in 4 cups of sifted powdered sugar while beating. Finally, mix in 1 tablespoon of vanilla extract and 1 teaspoon of lemon zest for a subtle zing.
Step 9: Frost the Cupcakes
-
Once your cupcakes have cooled completely, it’s time for the fun part!
Using a piping bag or a simple spatula, generously frost each cupcake with your cream cheese mixture. A little swirl always adds charm!
Nutrition Facts
Servings 24
- Amount Per Serving
- Calories 308kcal
- % Daily Value *
- Total Fat 11.6g18%
- Saturated Fat 6.9g35%
- Cholesterol 43mg15%
- Sodium 279mg12%
- Total Carbohydrate 47g16%
- Dietary Fiber 1g4%
- Sugars 37g
- Protein 4g8%
* Percent Daily Values are based on a 2,000 calorie diet. Your daily value may be higher or lower depending on your calorie needs.
Note
- Use Gel Food Coloring: It gives a more vibrant color and doesn’t alter the batter’s consistency.
- Room Temperature Ingredients: Use eggs and butter at room temperature for easier mixing.
- Don’t Overmix: Gently fold the batter to keep it airy.
- Piping Tips: Experiment with different piping tips for beautiful frosting designs.
- Chill the Frosting: If it gets too soft, refrigerate your cream cheese frosting for a short while before decorating.