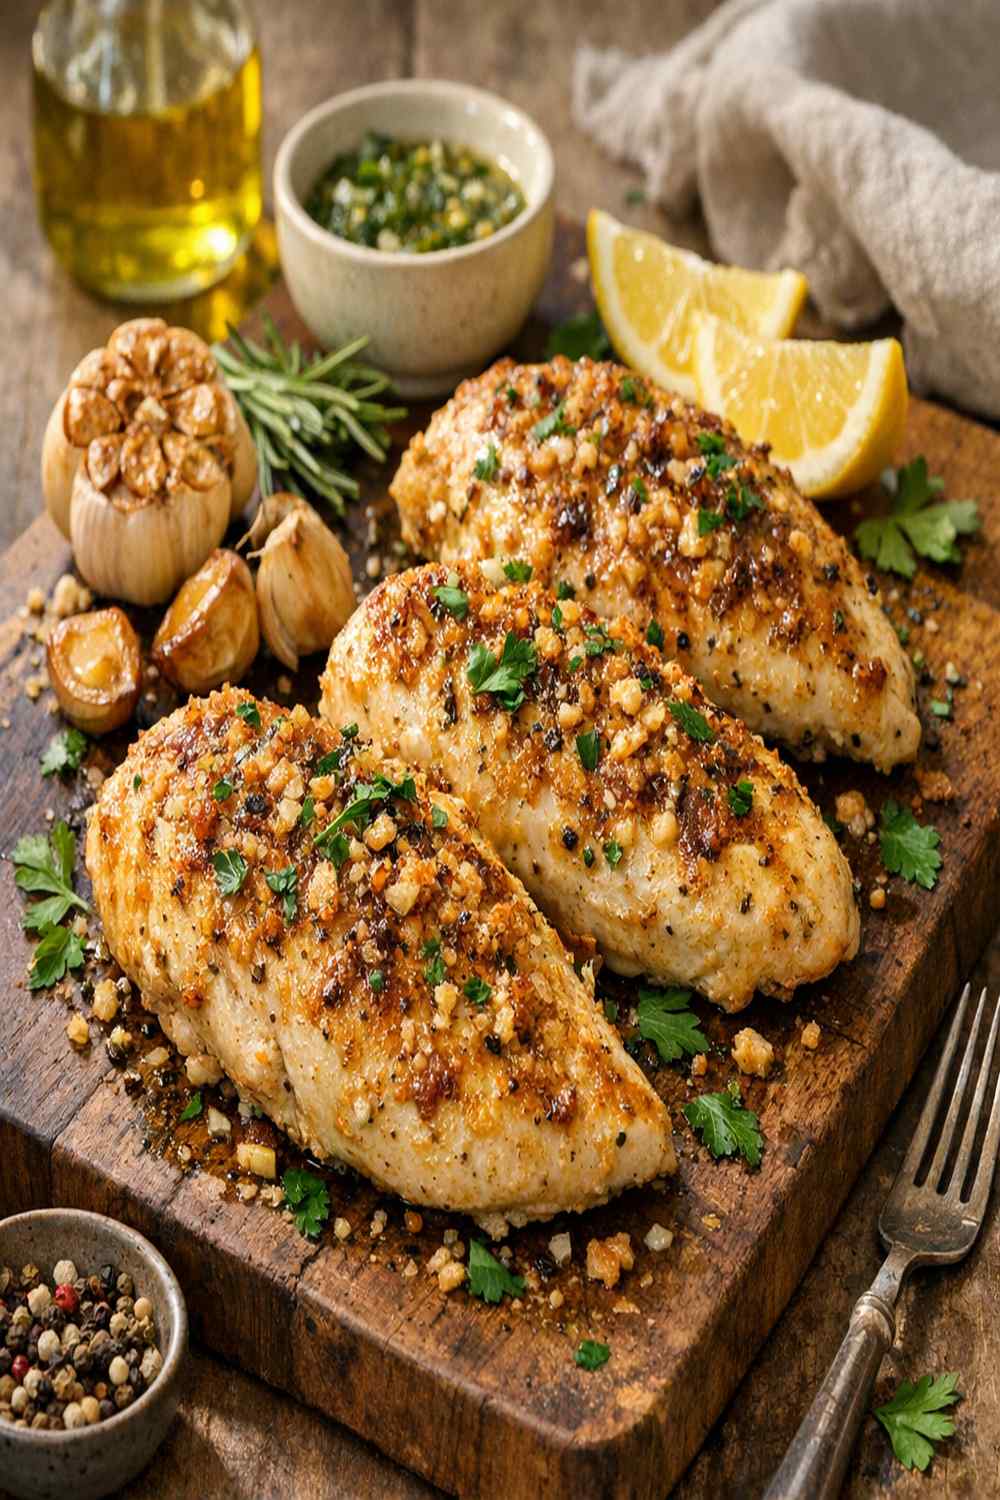
Baked Garlic Chicken Recipe
This post contains affiliate links. As an Amazon Associate I earn from qualifying purchases.
I remember the first time I served baked chicken to friends at my Manhattan apartment—it was DRIER than cardboard. I’d followed every rule, hit the temperature, and still managed to disappoint everyone at the table. Sound familiar? After years of working as a registered dietitian and experimenting in my tiny NYC kitchen, I figured out exactly why most baked chicken recipes fail, and I’m about to show you how to nail it EVERY single time. This isn’t complicated—it’s just about understanding the science behind what keeps chicken tender and infused with flavor.
Why Your Baked Chicken Never Turns Out Right (And How to Fix It)
Here’s what happens to most people: they preheat the oven, slap seasoning on raw chicken, and bake it straight through. The result? Rubbery, flavorless disappointment. The real problem is that chicken breasts cook FAST on the outside but stay pale and bland on the inside because they never develop a golden crust that locks in moisture. I learned this the hard way, and it changed everything.
The solution is a two-stage cooking method that I’ve perfected over years of recipe testing. We’re going to sear the chicken on the stovetop FIRST to create that golden exterior, then finish it in the oven with a garlic butter sauce that keeps it incredibly moist. This technique gives you restaurant-quality results at home, and it takes less than 35 minutes total. No fancy equipment required—just a cast iron skillet and your oven.
What Makes This Baked Garlic Chicken Recipe Different?
The secret is the sear-then-bake method combined with a garlic-infused butter topping. Most recipes skip the searing step entirely, which means your chicken never develops that beautiful golden crust that signals flavor development to your brain. When you sear first, you’re creating what chemists call the Maillard reaction—basically, amino acids and sugars caramelize on the surface, creating HUNDREDS of new flavor compounds in just 2-3 minutes. Then, by finishing in the oven with melted butter infused with garlic, fresh herbs, and spices, the chicken stays bathed in moisture while cooking through. That butter doesn’t just taste amazing—it actively prevents the chicken from drying out, which is why this method works so much better than dry-roasting alone.
Before You Start: What You Need to Know
There are two critical pieces of knowledge that separate success from failure with this recipe, and most cooking guides completely skip them. Let me spell them out clearly:
- Chicken breasts MUST be patted dry before searing— moisture is the enemy of browning. Any water on the surface will create steam, which prevents that gorgeous golden crust from forming. Use paper towels and don’t skip this step. It takes 20 seconds and makes a HUGE difference.
- Your oven temperature matters as much as your timing— a too-hot oven cooks the outside before the inside is done, leading to overcooked edges and an undercooked center. We’re using 400°F specifically because it finishes the chicken gently while keeping the butter from burning. This prevents the common mistake of having a beautiful crust with a cold, pale interior.
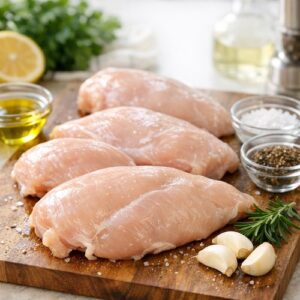
The Ingredients
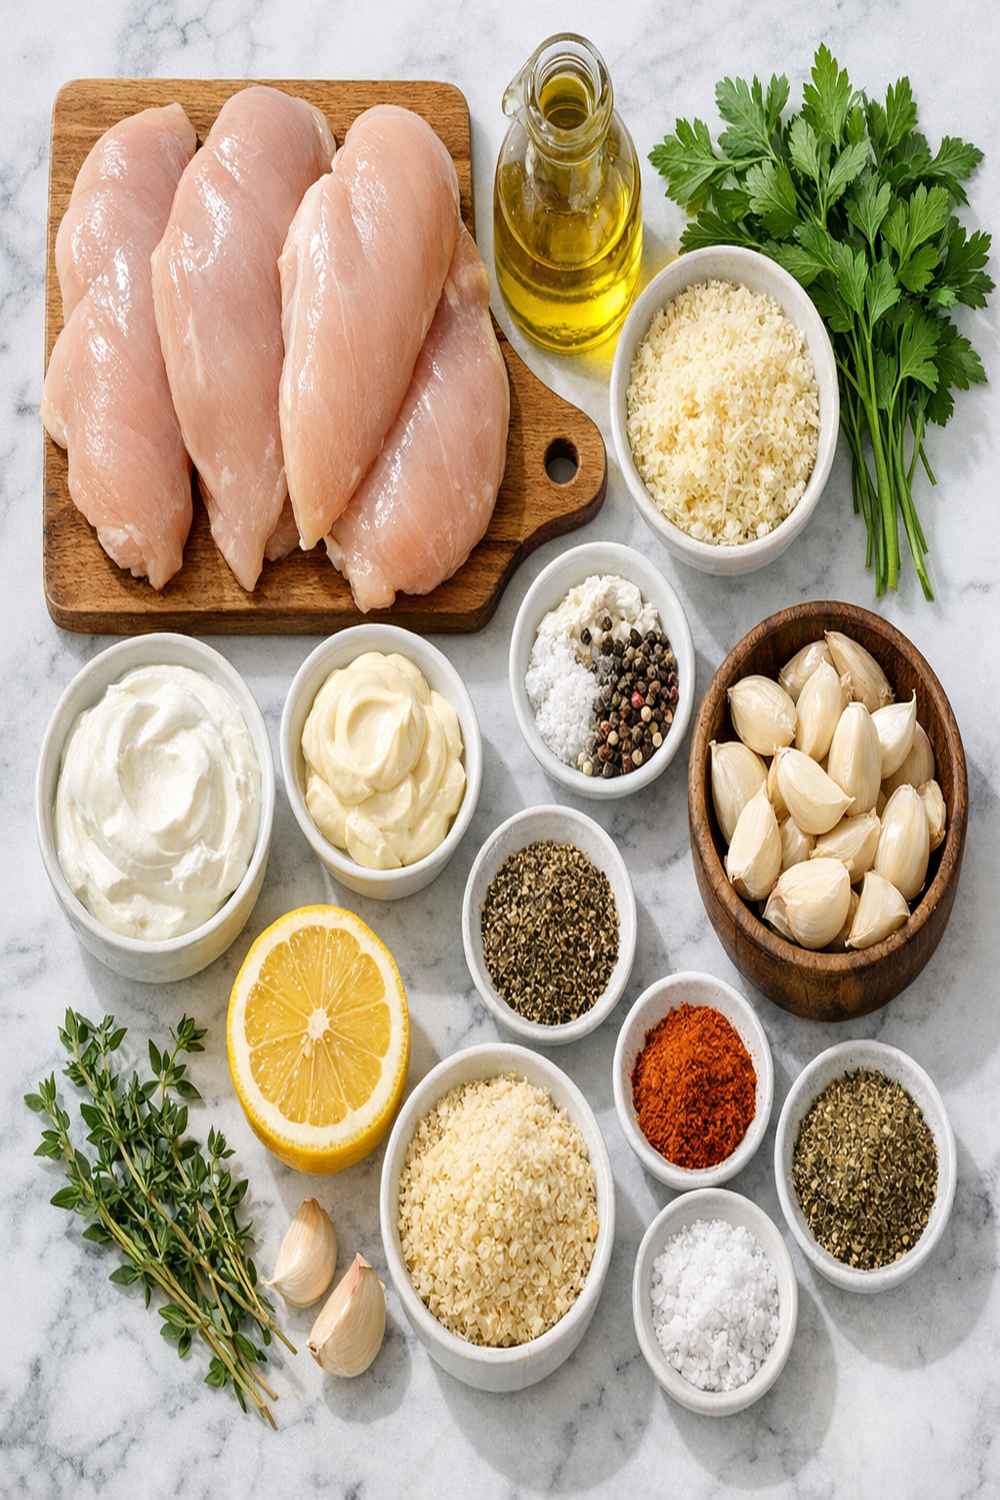
I’ve chosen each ingredient in this recipe for a very specific reason. There’s no filler here—everything serves a purpose, either for flavor, texture, or keeping your chicken moist and tender. Let me walk you through why each one matters, because understanding the WHY makes you a better cook.
- 1 teaspoon Italian seasoning (a blend that adds depth without overwhelming the delicate chicken flavor)
- ½ teaspoon paprika (adds color, warmth, and a subtle sweetness to the seasoning)
- ¼ cup low-sodium chicken broth (optional but recommended—adds moisture and prevents the pan from going completely dry if butter evaporates)
- 1 tablespoon fresh parsley (chopped, brightens the dish and adds a fresh herbaceous note at the end)
- Kosher salt and freshly ground black pepper (to taste; kosher salt is larger and distributes more evenly than table salt)
- 3 boneless skinless chicken breasts (about 6-8 ounces each, room temperature for even cooking)
- 1 tablespoon extra virgin olive oil (for searing, has a higher smoke point than regular olive oil)
- 4 tablespoons unsalted butter (melted, provides richness and keeps chicken moist during baking)
- ¼ teaspoon paprika (additional layer for the butter mixture, creates flavor complexity)
- 2 cloves fresh garlic (minced very finely, releases maximum flavor when mixed with warm butter)
Step-by-Step: How to Make Baked Garlic Chicken Recipe Without Fail
I’ve done this hundreds of times at this point, and I’m going to walk you through every single step with the confidence that you’re GOING to succeed. Don’t rush through this—read each step carefully, and I promise the results will blow your mind.
Step 1: Prep Your Chicken and Season the Base Layer
Remove your chicken breasts from the refrigerator 10-15 minutes before cooking. This is CRITICAL—room temperature chicken cooks more evenly than cold chicken straight from the fridge. While they’re warming up, take paper towels and pat each breast completely dry on both sides. Moisture will literally prevent browning, so don’t skip this. Pat them like you mean it.
On a clean cutting board or plate, season both sides of each chicken breast generously with kosher salt, freshly ground black pepper, and ½ teaspoon of paprika divided among the three breasts. Don’t be shy with the salt—it seasons the chicken from the inside out and helps retain moisture during cooking. Set the seasoned chicken aside.

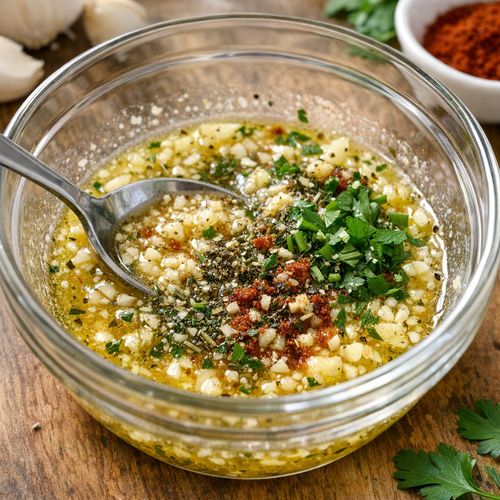
Step 2: Make Your Garlic Butter Mixture
In a small bowl, combine your 4 tablespoons of melted butter with the minced garlic, Italian seasoning, remaining ¼ teaspoon paprika, and chopped fresh parsley. Stir it well and set it aside—this is your flavor bomb, and you’ll use it to baste the chicken during the final baking stage. The heat from the melted butter will gently infuse the garlic flavor throughout, creating that restaurant-quality sauce. If you melt the butter in the microwave, let it cool for just 30 seconds before mixing with the fresh herbs so they don’t wilt completely.
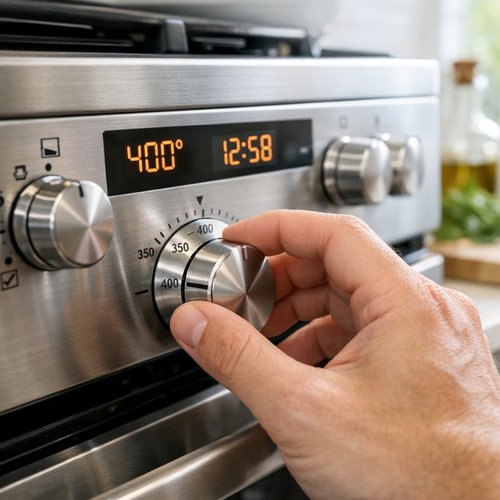
Step 3: Preheat Your Oven to 400°F
This is your signal to turn on the oven NOW, even before you start searing. Your oven needs 10-15 minutes to reach full temperature. A properly preheated oven is NON-NEGOTIABLE for even cooking. If you skip this, your chicken will bake at a lower temperature initially, which means the cooking time becomes unpredictable and your results become inconsistent.
Step 4: Heat Your Skillet and Sear the Chicken
Place your cast iron skillet (or heavy oven-safe skillet—this is important because it needs to go directly into the oven) on the stovetop over medium heat. Add 1 tablespoon of extra virgin olive oil and let it heat for about 1 minute. You’ll know it’s ready when you place your hand a few inches above the pan and feel significant heat—you’re not looking for smoking oil, just shimmering oil with real heat behind it.
Carefully place each seasoned chicken breast into the hot skillet. DON’T MOVE THEM. Let them sear undisturbed for 1-2 minutes on the first side. You’re building that Maillard reaction crust that I mentioned earlier—interrupting it by flipping constantly ruins the whole point. After 1-2 minutes, flip each breast carefully and sear the other side for 1-2 minutes. You’re not trying to cook them all the way through—just create that golden exterior. The chicken will still be pale in the very center, and that’s EXACTLY what you want.
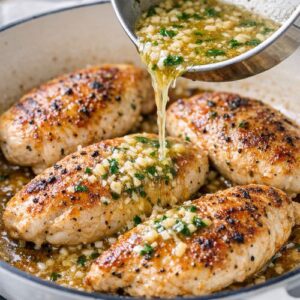
Step 5: Pour in the Garlic Butter and Transfer to the Oven
Once both sides of each chicken breast have that beautiful golden color, carefully pour your garlic butter mixture over the top of the chicken. The butter will sizzle—that’s the sound of flavor happening. If you want extra insurance against dryness, add ¼ cup of low-sodium chicken broth to the pan at this point.
Now comes the magic moment: transfer the entire skillet to your preheated 400°F oven. Use an oven mitt because the handle WILL be hot. Bake for 18-22 minutes, depending on the thickness of your chicken breasts. We’ll talk about exactly how to know when it’s done in the next section.

Step 6: Baste and Rest
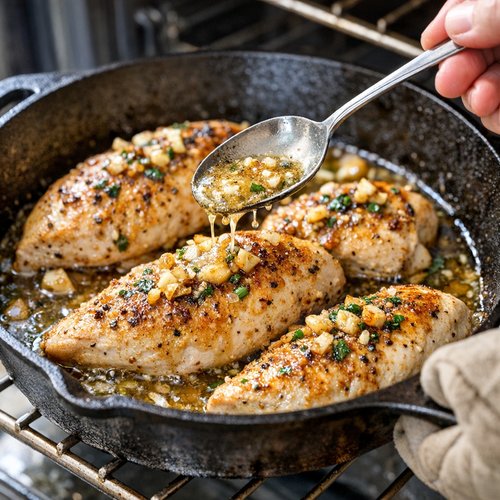
Halfway through baking (around the 10-minute mark), carefully remove the skillet from the oven and use a spoon to baste the chicken—basically, spoon some of that gorgeous garlic butter that’s accumulated in the pan back over the top of each breast. This keeps everything moist and distributes the flavor. Return it to the oven and finish cooking.
When the chicken reaches the safe internal temperature (we’ll discuss this in detail next), remove it from the oven and let it rest in the skillet for 3-5 minutes. This allows the juices to redistribute throughout the meat, which means when you cut into it, those juices stay INSIDE the chicken instead of running all over your plate. This resting period is why restaurant chicken tastes so much juicier than home-cooked chicken.
The Most Common Mistakes (And How to Avoid Them)
- Skipping the searing step or using low heat—this is the number one reason people end up with pale, flavorless chicken. If your oil isn’t shimmering and your heat isn’t medium or higher, your chicken won’t brown. LOW and SLOW is great for pulled pork, but NOT for this technique. You need real heat for 2-3 minutes to develop that crust. If your heat is too low, you’ll steam the chicken instead of searing it.
- Cooking chicken straight from the refrigerator—cold chicken has uneven internal temperature, which means the edges overcook before the center reaches safe temperature. Always bring chicken to room temperature for 10-15 minutes before cooking. This is especially important with this recipe because we’re using a relatively high oven temperature. Room temperature chicken gives you a buffer zone for perfect doneness.
- Not patting the chicken completely dry before searing—I cannot stress this enough. Water and browning do not coexist. You will NEVER get a proper crust if there’s moisture on the surface. Use paper towels aggressively. This step takes 30 seconds and changes EVERYTHING.
- Opening the oven door repeatedly to check on the chicken—every time you open the door, you drop the internal oven temperature by 25-50 degrees. This extends cooking time unpredictably. Set a timer and check only once, at the 18-minute mark. Trust the process.
How Do I Know When It’s Done?
This is where most recipes fail you with vague instructions like “cook until done.” Let me be PRECISE.
The gold standard is internal temperature: use an instant-read thermometer inserted into the thickest part of the chicken breast, not touching bone. You need 165°F for food safety according to USDA guidelines. This is the only foolproof method, and it takes 3 seconds. Don’t guess. Get a thermometer—they’re ten dollars and will change your cooking life.
Beyond temperature, look for these visual and textural cues: The chicken should be golden brown on top, the edges should have begun to curl slightly upward (which means the proteins have contracted as they cooked), and when you cut into the thickest part, the juices should run clear, not pink. The meat itself should be opaque white throughout, not translucent.
One more thing: if your chicken has reached 165°F but the top isn’t as golden as you’d like, you can turn your oven to broil for the final 2-3 minutes. This will finish the browning without drying out the interior. Watch it carefully—broilers are aggressive and can char quickly.
Troubleshooting: When Things Go Wrong
- Chicken is done (165°F) but still looks pale on top—this means your initial sear wasn’t hot enough or long enough. Next time, increase your stovetop heat to medium-high and sear for the full 2 minutes per side. If this happens mid-cook, switch to broil for the final 2-3 minutes to finish the browning. Watch carefully to prevent burning.
- Chicken is overcooked and dry despite hitting 165°F—your oven temperature is likely running hot (ovens vary significantly). Get an oven thermometer and check the actual temperature. If it’s running 25+ degrees hot, reduce your set temperature to 375°F next time. Also, cook for the shorter end of the time range (18 minutes instead of 22). Thinner breasts cook faster than thicker ones.
- Butter is burning in the pan—your oven is too hot or your chicken was already overcooked before going in the oven. Reduce oven temperature to 375°F, keep the sear time shorter (1.5 minutes per side instead of 2), and move the chicken to the oven faster. Butter has a smoke point of around 350°F, so if your oven is significantly hotter, it will burn. You can also add the chicken broth (mentioned in the ingredients) to cool down the pan mixture.
- Chicken is rubbery or tough in texture—this usually means overcooking. Your oven is likely running hot. Use an oven thermometer to verify actual temperature, and reduce your cooking time by 2-3 minutes. This is also why resting for 3-5 minutes after cooking is so important—it makes overcooked chicken slightly more forgiving by allowing proteins to reabsorb some moisture.
Can I Store Baked Garlic Chicken Recipe?
Absolutely, and this is where meal prep becomes your secret weapon. From a professional dietitian perspective, having this ready-to-eat protein in your fridge is TRANSFORMATIVE for staying on track with nutrition goals throughout the week.
Refrigerator storage: Keep your cooled chicken in an airtight container for up to 3-4 days. The garlic butter will solidify slightly as it cools, which actually helps preserve moisture. You can reheat it gently in a 325°F oven for 8-10 minutes (covered with foil so it doesn’t dry out), or reheat individual portions in the microwave at 50% power for 1-2 minutes. Microwave reheating is gentler than high power and helps prevent overdrying.
Freezer storage: This freezes beautifully for up to 3 months. Wrap each chicken breast individually in plastic wrap, then place them together in a freezer bag. This prevents freezer burn and lets you thaw just what you need. Thaw overnight in the refrigerator, then reheat as described above.
Pro tip: freeze the chicken on a baking sheet FIRST (uncovered for 2 hours), then transfer to freezer bags. This prevents sticking and makes thawing more even.
Nutrition Information
I’m sharing nutrition information based on USDA data for a single serving (one chicken breast with sauce, serves 3): approximately 280-320 calories, 36-38g protein, 14-16g fat, and less than 1g carbohydrate per serving. This is an extraordinarily protein-rich meal with very minimal carbs, which makes it PERFECT if you’re managing blood sugar or trying to build lean muscle. The protein content is high enough to keep you satisfied for hours, and the fat from the butter actually helps with nutrient absorption and satiety.
From my expertise as a registered dietitian, I want to highlight something important: the fresh garlic in this recipe isn’t just flavor—it contains compounds like allicin that have been studied for cardiovascular benefits. The extra virgin olive oil used for searing contains polyphenols with antioxidant properties. When you combine these elements with the high-quality protein from chicken breast, you’re creating a meal that nourishes your body at the cellular level, not just fills your stomach. This is the kind of food I recommend regularly to clients in my NYC practice because it tastes incredible AND it makes nutritional sense.
What Can I Serve With Baked Garlic Chicken Recipe?
This chicken is versatile enough to pair with almost anything, but here are my favorite combinations that balance nutrition and flavor perfectly:
- Roasted vegetables (broccoli, Brussels sprouts, or green beans)—these add fiber, vitamins, and a textural contrast to the tender chicken. Toss them with a little olive oil and season similarly to create a cohesive plate.
- Cauliflower rice or regular rice—if you want to soak up that gorgeous garlic butter sauce, serve with a grain or cauliflower rice. The starch helps balance the richness of the butter perfectly.
- A fresh salad with lemon vinaigrette—this is my go-to. The acidity cuts through the richness of the butter and cleanses your palate between bites. A simple arugula salad works beautifully.
- Creamy mashed potatoes or sweet potatoes—if you want something more indulgent, pair this with buttery mashed potatoes. The two buttery components actually work together beautifully rather than feeling heavy.
If you’re looking for sauce pairings, check out my Best Chicken Gravy Recipe for a more formal presentation, or simply serve the garlic butter from the pan over everything on your plate.
Expert’s Nutritional Tip: Understanding the Garlic Factor
Here’s something most recipes miss entirely: raw garlic and cooked garlic have completely different nutritional profiles. Raw garlic contains the enzyme alliinase, which converts to allicin—the compound with the most studied health benefits for cardiovascular health. When you cook garlic, some of that allicin breaks down, but your body actually absorbs the fat-soluble nutrients MORE effectively when garlic is combined with oil or butter.
In this recipe, I’m mincing the garlic finely and mixing it into melted butter, which creates the BEST of both worlds: enough heat to make the dish taste incredible and develop new flavor compounds, but gentle enough that you retain meaningful amounts of beneficial compounds. This is why aged garlic extracts are showing promise in nutrition research—it’s the balance between the fresh and the cooked that matters most.
Make-Ahead and Meal Prep Guide
I use this recipe constantly in my own meal prep routine because it’s SO efficient for batch cooking. Here’s exactly how I do it:
The Night Before: Prep your garlic butter mixture in a small container and refrigerate. Pat your chicken breasts dry, season them with salt and pepper and paprika, and place them on a plate covered loosely with plastic wrap in the fridge. This lets them get closer to room temperature naturally as you prepare them the next day.
Batch Cooking for the Week: You can absolutely triple or quadruple this recipe using two cast iron skillets simultaneously. Sear all your chicken in batches (use the first skillet while the second is in the oven), divide your garlic butter between two skillets, and stagger the baking. This lets you have ready-to-eat protein for 3-4 days of meals.
Five-Day Meal Plan Hack: Make this recipe on Sunday, let it cool completely, and portion into containers with your choice of sides. You now have lunch or dinner ready for Monday through Wednesday. Reheat gently, and you have an elevated meal in 10 minutes that tastes far better than anything you’d get from takeout.
Seasonal Variations: How to Adapt This Recipe Year-Round
Spring variation: Replace half the Italian seasoning with fresh tarragon or dill. Add the zest of one lemon to the garlic butter. Serve with asparagus and new potatoes. The brightness suits the season perfectly.
Summer variation: Skip the paprika and add 1 teaspoon of dried oregano and a pinch of garlic powder to the butter instead. Finish with fresh basil instead of parsley. Serve cold or at room temperature with a tomato and cucumber salad. Perfect for dinner that doesn’t heat up your apartment.
Fall variation: Add ½ teaspoon of dried thyme and a tiny pinch of cayenne to the seasoning. Finish the chicken with crispy sage leaves fried in the butter. Serve with roasted root vegetables and butternut squash.
Winter variation: Add ½ teaspoon of smoked paprika instead of regular paprika. Include crispy bacon bits in the garlic butter. Serve with creamed spinach and mashed potatoes. The smoke and richness suits cold weather comfort food perfectly.
Baked Garlic Chicken Recipe
Ingredients
Method
- Remove your chicken breasts from the refrigerator 10-15 minutes before cooking. This is CRITICAL—room temperature chicken cooks more evenly than cold chicken straight from the fridge. While they're warming up, take paper towels and pat each breast completely dry on both sides. Moisture will literally prevent browning, so don't skip this. Pat them like you mean it. On a clean cutting board or plate, season both sides of each chicken breast generously with kosher salt, freshly ground black pepper, and ½ teaspoon of paprika divided among the three breasts. Don't be shy with the salt—it seasons the chicken from the inside out and helps retain moisture during cooking. Set the seasoned chicken aside.
- In a small bowl, combine your 4 tablespoons of melted butter with the minced garlic, Italian seasoning, remaining ¼ teaspoon paprika, and chopped fresh parsley. Stir it well and set it aside—this is your flavor bomb, and you'll use it to baste the chicken during the final baking stage. The heat from the melted butter will gently infuse the garlic flavor throughout, creating that restaurant-quality sauce. If you melt the butter in the microwave, let it cool for just 30 seconds before mixing with the fresh herbs so they don't wilt completely.

- This is your signal to turn on the oven NOW, even before you start searing. Your oven needs 10-15 minutes to reach full temperature. A properly preheated oven is NON-NEGOTIABLE for even cooking. If you skip this, your chicken will bake at a lower temperature initially, which means the cooking time becomes unpredictable and your results become inconsistent.
- Place your cast iron skillet (or heavy oven-safe skillet—this is important because it needs to go directly into the oven) on the stovetop over medium heat. Add 1 tablespoon of extra virgin olive oil and let it heat for about 1 minute. You'll know it's ready when you place your hand a few inches above the pan and feel significant heat—you're not looking for smoking oil, just shimmering oil with real heat behind it. Carefully place each seasoned chicken breast into the hot skillet. DON'T MOVE THEM. Let them sear undisturbed for 1-2 minutes on the first side. You're building that Maillard reaction crust that I mentioned earlier—interrupting it by flipping constantly ruins the whole point. After 1-2 minutes, flip each breast carefully and sear the other side for 1-2 minutes. You're not trying to cook them all the way through—just create that golden exterior. The chicken will still be pale in the very center, and that's EXACTLY what you want.

- Once both sides of each chicken breast have that beautiful golden color, carefully pour your garlic butter mixture over the top of the chicken. The butter will sizzle—that's the sound of flavor happening. If you want extra insurance against dryness, add ¼ cup of low-sodium chicken broth to the pan at this point. Now comes the magic moment: transfer the entire skillet to your preheated 400°F oven. Use an oven mitt because the handle WILL be hot. Bake for 18-22 minutes, depending on the thickness of your chicken breasts. We'll talk about exactly how to know when it's done in the next section.
- Halfway through baking (around the 10-minute mark), carefully remove the skillet from the oven and use a spoon to baste the chicken—basically, spoon some of that gorgeous garlic butter that's accumulated in the pan back over the top of each breast. This keeps everything moist and distributes the flavor. Return it to the oven and finish cooking. When the chicken reaches the safe internal temperature (we'll discuss this in detail next), remove it from the oven and let it rest in the skillet for 3-5 minutes. This allows the juices to redistribute throughout the meat, which means when you cut into it, those juices stay INSIDE the chicken instead of running all over your plate. This resting period is why restaurant chicken tastes so much juicier than home-cooked chicken.

Notes
FAQs
Why is my chicken always dry, even when I cook it to 165°F?
This is the most common complaint I hear, and it usually comes down to THREE factors: First, your chicken might be starting from too cold a temperature (straight from fridge) which creates uneven cooking. Second, you might be using low heat for searing, which means the chicken steams instead of browns, and steamed chicken is ALWAYS drier than seared chicken because the moisture stays trapped as steam. Third, you might be cooking it past 165°F—even a few degrees over will noticeably dry it out. Use a thermometer and hit 165°F and STOP. Also, always rest the chicken for 3-5 minutes after cooking. This allows the juices to redistribute internally instead of running all over your plate.
Can I use chicken thighs instead of chicken breasts?
Absolutely, and honestly, thighs are MORE forgiving because they have more fat content. They stay juicy longer, which means even if you accidentally overcook slightly, they’re still edible. Thighs will need about 25-28 minutes in the oven at 400°F instead of 18-22 minutes because they’re thicker. They’ll reach 165°F at the thickest part (same target temperature). They’re slightly higher in calories due to fat content, but many people prefer the richer flavor.
What if I don’t have a cast iron skillet?
You NEED an oven-safe skillet—that’s non-negotiable because you’re transferring it from stovetop to oven. Cast iron is ideal because it distributes heat evenly and retains heat beautifully, but stainless steel or ceramic oven-safe skillets work too. Just know that stainless steel won’t brown quite as evenly as cast iron, and you might need slightly longer searing time. DO NOT use a skillet with a plastic handle—that will melt in the oven. Check your skillet handle before starting.
Can I make this recipe without butter?
Technically yes, but I wouldn’t recommend it for this specific recipe because the butter serves a crucial function—it keeps the chicken moist AND creates that incredible sauce. If you must avoid butter for dietary reasons, you could use ghee (clarified butter, which some people tolerate better) or a combination of olive oil and chicken broth. You’ll lose some of the luxurious richness, but the chicken will still be good. Use 3 tablespoons olive oil mixed with 1 tablespoon chicken broth instead of the 4 tablespoons butter. It won’t be quite the same, but it’ll still taste delicious.
Why do you use both paprika measurements separately (½ teaspoon on the chicken and ¼ teaspoon in the butter)?
This is intentional layering of flavor. The ½ teaspoon on the raw chicken seasons it from the outside as it cooks and creates a deeper color on the seared surface. The additional ¼ teaspoon in the butter adds another layer of paprika flavor to the sauce, which gives complexity. If you added all ¾ teaspoon to just one step, you’d get a paprika taste that’s either too strong on the chicken or too subtle in the sauce. This two-step approach balances the flavor throughout the entire dish. It’s a technique I learned from working with diverse food cultures here in NYC—layering small amounts of spices creates more sophisticated flavor than dumping everything in one place.
More Recipes You’ll Love
- Boneless Skinless Chicken Strip Recipe – when you want crispy-coated chicken with that same tender interior
- Best Chicken Gravy Recipe – transform your pan drippings into an elegant sauce
You now have everything you need to make baked garlic chicken that’s genuinely BETTER than most restaurant versions. You understand the science behind why each step matters, you know exactly how to troubleshoot if something goes wrong, and you have a foolproof method that works consistently. The difference between good cooks and great cooks isn’t talent—it’s understanding the WHY behind the HOW. That’s exactly what you have now. This recipe will become a staple in your kitchen because it’s simple, it’s healthy, it’s genuinely delicious, and it impresses people every single time. I’m genuinely excited for you to make this. Let’s make cooking a breeze!
META DESCRIPTION: Master baked garlic chicken with this sear-then-bake method. Stay juicy, restaurant-quality results in 35 minutes. Expert tips from a registered dietitian.
