Baked Dijon Chicken Recipe
This post contains affiliate links. As an Amazon Associate I earn from qualifying purchases.
This baked Dijon chicken recipe is one of my FAVORITE weeknight wins—and honestly, it pairs beautifully with so many sides. Whether you’re serving it over rice, alongside roasted vegetables, or with a simple salad, this creamy mustard-forward dish checks ALL the boxes for nutrition and flavor. The beauty of this recipe is that it comes together in under 30 minutes, making it perfect for busy nights when you still want something that feels restaurant-quality. If you’re looking for other quick protein options, check out my best chicken gravy recipe for another crowd-pleasing chicken dinner.
How I Fell in Love with Dijon Chicken (And Why You Will Too)
I remember standing in a tiny French bistro in the East Village about eight years ago, fork in hand, absolutely mesmerized by a simple chicken breast bathed in the most incredible creamy mustard sauce. The Dijon mustard wasn’t overpowering—it was sophisticated, tangy, and perfectly balanced with butter and cream. I sat there thinking, “I HAVE to recreate this in my own kitchen.”
Fast forward through probably 20+ iterations in my NYC apartment kitchen, and I finally nailed it. What started as a restaurant obsession became my go-to recipe for clients who say they “don’t have time to cook.” The secret? Using a technique that maximizes flavor WITHOUT fussy steps or complicated equipment. It’s become one of those recipes I recommend constantly because it teaches you fundamentals—searing proteins, building sauces from pan drippings, and balancing acid and richness.

What is Baked Dijon Chicken Recipe?
This is a French-inspired dish that transforms simple chicken breasts into something absolutely SPECTACULAR. The chicken gets seasoned with Italian herbs, garlic, and onion powder, then seared until golden brown. The magic happens next: you build a silky sauce right in the same pan using Dijon mustard, chicken broth, cream, and fresh spinach.
What makes this different from random chicken recipes you’ll find online is the technique. By searing the chicken first, you create what we call “fond”—those beautiful browned bits stuck to the pan bottom that are LOADED with flavor. When you deglaze the pan (fancy word for pouring in liquid), those bits dissolve into your sauce and create incredible depth. This is restaurant-level cooking made simple.
The spinach adds nutritional value (we’re talking folate, iron, and vitamin K), while the Dijon mustard provides brightness without needing lemon or vinegar. It’s elegant enough for company but simple enough that you’ll make it on a random Tuesday night.
Why You’ll Love This Baked Dijon Chicken Recipe
- Under 30 minutes from start to finish – I’m talking actual cooking time, not including shopping. Perfect for weeknight dinners when you’re exhausted.
- Naturally protein-rich and lower in carbs – Each serving packs approximately 35 grams of protein, making it ideal for anyone tracking macros or wanting to feel satisfied longer.
- One-skillet wonder – Everything happens in ONE pan, which means minimal cleanup and maximum flavor building.
- Restaurant-quality results at home – This tastes like you spent hours on it. Your family will be genuinely impressed.
- Adaptable to seasons and preferences – Swap spinach for kale, use different mustards, or add mushrooms. The technique stays the same.
- Budget-friendly without feeling cheap – The total cost for this entire recipe comes to approximately $8.90 for two generous servings. That’s about $4.45 per person.
- Great for meal prep – This reheats beautifully and actually tastes better the next day as flavors deepen.
The Ingredients
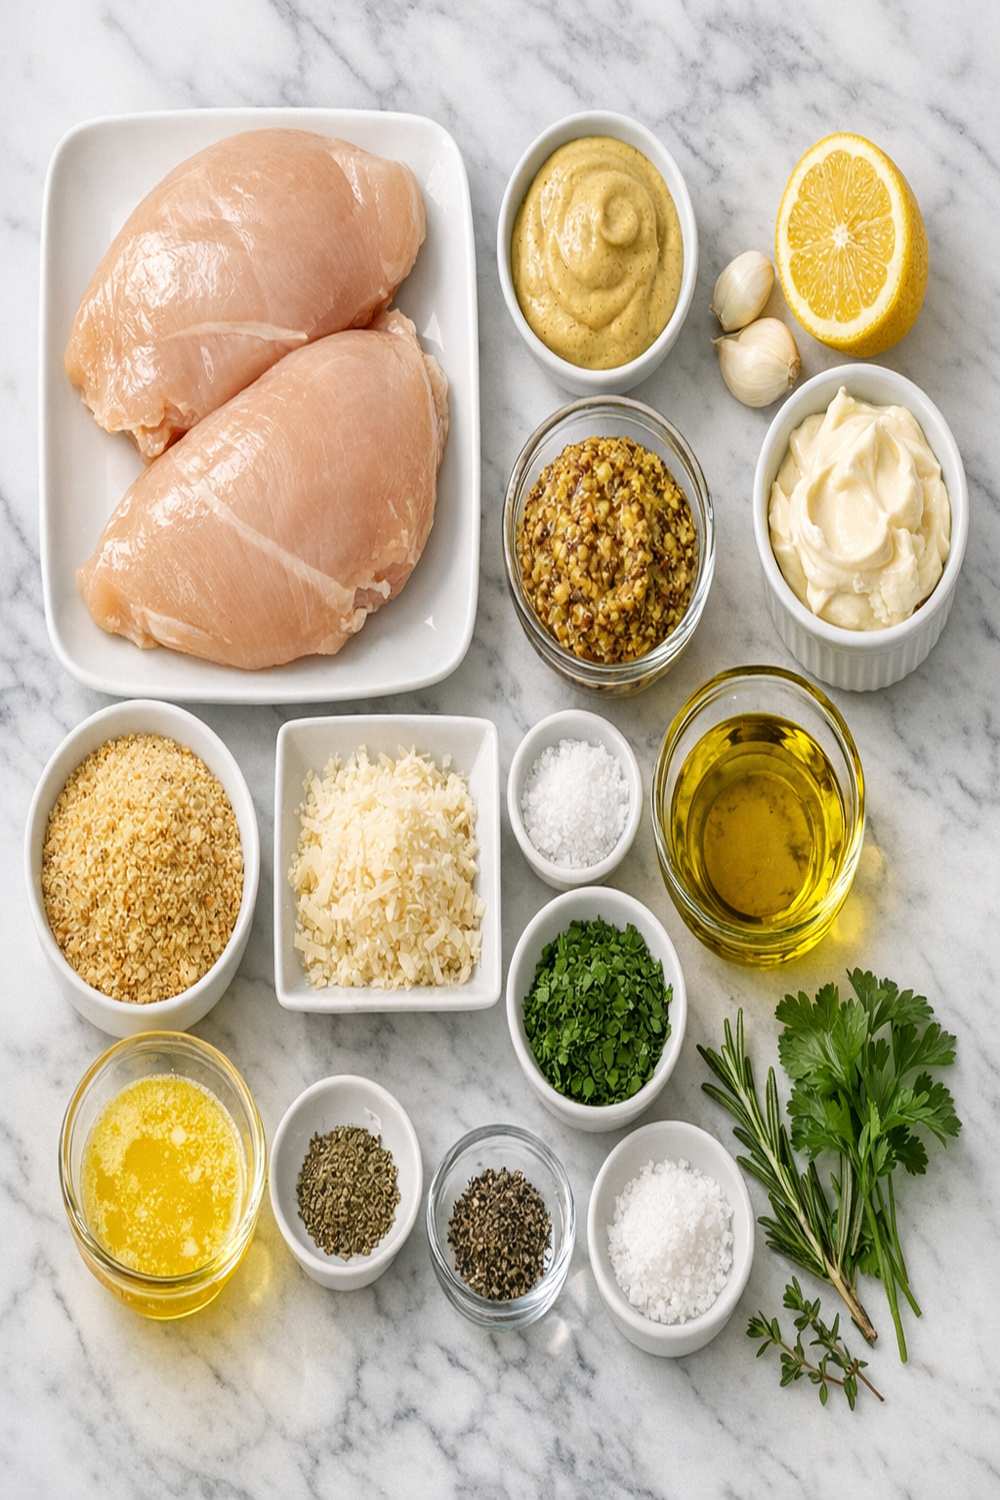
I’ve organized these ingredients by category to make shopping and prep easier. Everything here serves TWO people generously, or works as a starter course for four. Here’s what you’ll need to create this magic:
For the Chicken and Seasoning
- ½ teaspoon freshly cracked black pepper (freshly ground tastes SIGNIFICANTLY better than pre-ground)
- 2 boneless, skinless chicken breasts (approximately 1.3 pounds total, ideally similar thickness)
- ½ teaspoon garlic powder (not garlic salt, which adds extra sodium)
- ½ teaspoon kosher salt (Diamond Crystal brand recommended for better control)
- ½ teaspoon onion powder (adds subtle sweetness without texture)
- 1 teaspoon Italian seasoning blend (dried oregano, basil, and thyme combined)
For Cooking and the Sauce
- 2 tablespoons freshly grated Parmesan cheese (NOT the pre-shredded stuff with anti-caking agents)
- 1 cup low-sodium chicken broth (homemade is ideal, but store-bought works perfectly)
- 2 tablespoons unsalted butter (cultured butter adds deeper flavor if you can find it)
- ⅓ cup heavy cream (full-fat only, not half-and-half)
- 1 teaspoon Worcestershire sauce (adds umami depth—this is non-negotiable)
- 1 tablespoon Dijon mustard (whole grain adds nice texture, but classic yellow works too)
- 2 tablespoons extra virgin olive oil (use a mid-range option, not your expensive finishing oil)
- 2 cloves fresh garlic (minced, not pre-minced from a jar)
- 2 cups fresh baby spinach (wilts down dramatically, so don’t be intimidated by the volume)
How to Make Baked Dijon Chicken Recipe?
I’m going to walk you through this step-by-step, and I want you to know that even if you’ve never made this before, you’ve got this. I’m including my professional tips throughout because I want you to feel CONFIDENT in the kitchen. Let’s do this!
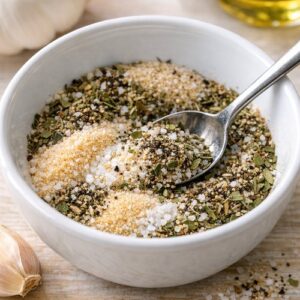
Step 1: Create Your Seasoning Blend
In a small bowl (a cereal bowl works great), combine your Italian seasoning, garlic powder, onion powder, salt, and freshly cracked black pepper. Stir everything together with a fork until well mixed. This takes about 30 seconds and ensures your chicken gets evenly seasoned. PRO TIP: If your Italian seasoning is old (over one year), buy fresh—dried herbs lose potency quickly and you’ll taste the difference.

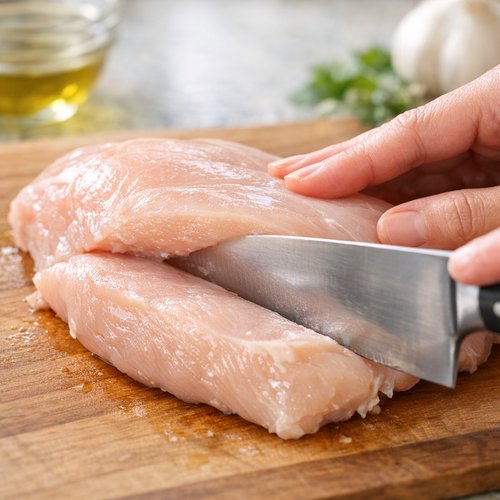
Step 2: Prepare Your Chicken Properly
This is CRITICAL for even cooking. Take each chicken breast and carefully place it on your cutting board. Using a sharp chef’s knife (dull knives are actually MORE dangerous because they slip), position the blade horizontally about halfway through the thickness of the breast. Gently slice through while keeping your hand flat on top, creating two thinner cutlets from each breast. You should end up with four cutlets total—this DRAMATICALLY reduces cooking time and ensures nothing gets dried out. Pat each cutlet dry with paper towels (moisture prevents browning) and season both sides generously with your seasoning blend.
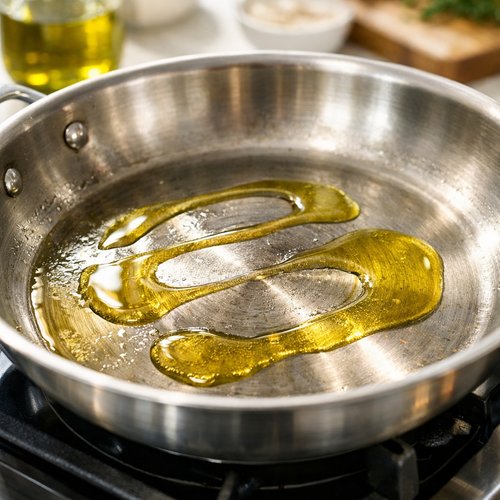
Step 3: Get Your Pan Properly Hot
Place your large skillet over MEDIUM heat (not high—patience is your friend here). Add your olive oil and let it heat for about 90 seconds. You’ll know it’s ready when you swirl the oil and it flows easily across the pan. If you drop a tiny piece of chicken in and it immediately sizzles loudly, you’re good to go. This step prevents sticking and creates that beautiful golden crust.
SAFETY WARNING: Keep your face and hands back from the pan when placing chicken—the hot oil can splatter. Always use tongs or a spatula to place protein, never your hands.
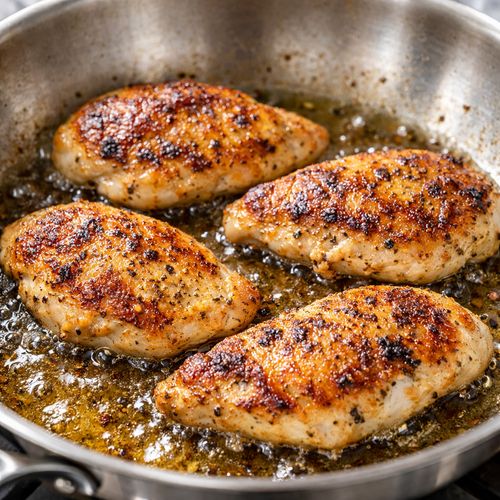
Step 4: Sear the Chicken Until Golden
Once your pan is hot, carefully place all four cutlets into the oil. DO NOT touch them for 4 minutes—I know it’s tempting, but this is how you build that golden crust. After exactly 4 minutes, flip each cutlet and cook the other side for another 4 minutes. The chicken should be golden brown on both sides and cooked through (165°F internal temperature if you want to verify with a meat thermometer, which I highly recommend).
Remove the cooked chicken to a clean plate and cover it loosely with foil or a lid to keep it warm. Don’t worry if it seems slightly underdone—it’ll continue cooking when we return it to the sauce.
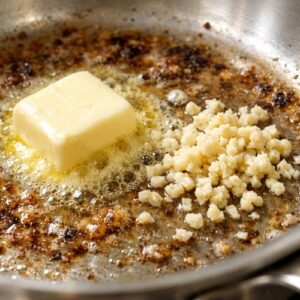
Step 5: Build Your Flavor Base
In the SAME skillet (all that flavorful fond is still there!), reduce heat to MEDIUM-LOW and add your butter and minced garlic. Sauté for exactly 1 minute—you want the garlic fragrant and starting to turn golden, NOT brown or bitter. This smell is INCREDIBLE and tells you your pan temperature is perfect.

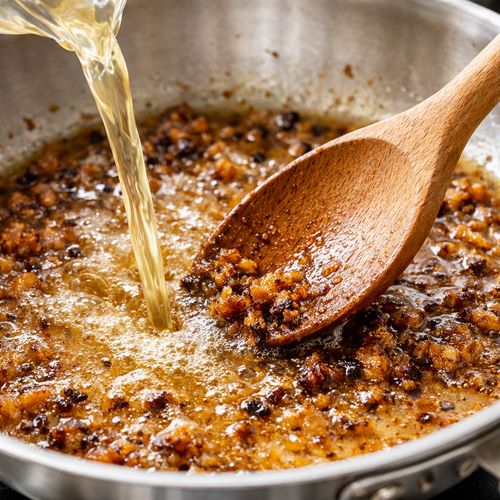
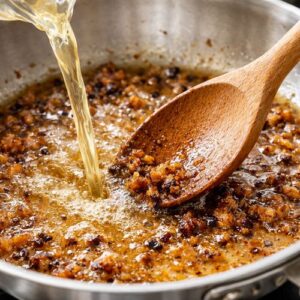
Step 6: Deglaze and Build the Sauce
Pour in your chicken broth and immediately use a wooden spoon to scrape up all those browned bits from the pan bottom. This is where the magic happens—those bits contain concentrated chicken flavor. Add your Dijon mustard and Worcestershire sauce, stirring until completely combined. You should see the sauce lighten slightly and smell absolutely divine.
Pro tip from my dietitian experience: The Dijon mustard here adds brightness AND probiotic cultures if you’re using unpasteurized varieties. The fermented nature of mustard aids digestion and adds complexity without salt.
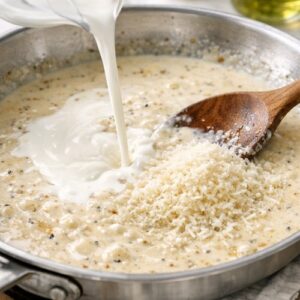
Step 7: Cream and Finish the Sauce
Pour in your heavy cream and sprinkle in your freshly grated Parmesan cheese. Stir everything together and let the sauce simmer gently for 5 minutes. This allows the flavors to meld and the sauce to thicken slightly. Taste it at this point—if you want more salt or pepper, add a pinch. Remember, you can always add more seasoning, but you can’t remove it.

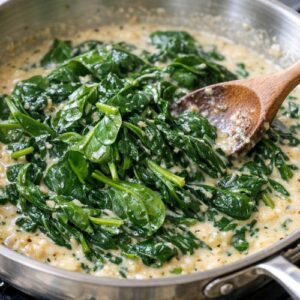
Step 8: Wilt in the Spinach
Add your fresh spinach to the sauce, stirring constantly. Within 2-3 minutes, the spinach will completely wilt into the sauce. It looks like you added a massive amount of greens, but trust me—it shrinks dramatically. This adds nutrients (iron, folate, vitamin K) and creates a beautiful, vibrant sauce.

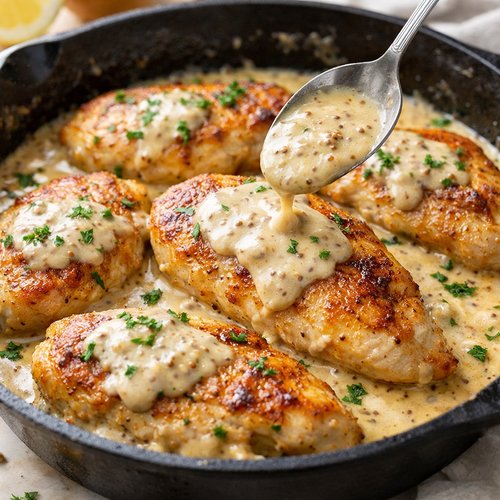
Step 9: Return the Chicken and Serve
Return your golden chicken cutlets to the skillet, nestling them into the Dijon sauce. Spoon some sauce over each piece and let everything heat through for about 2 minutes. The chicken should be hot throughout and the sauce should be bubbling gently around the edges.
Transfer to plates immediately and serve HOT. The plating itself makes this feel restaurant-quality—arrange the chicken on the plate and spoon extra sauce over top.
Expert’s Nutritional Insight
As a registered dietitian, I want you to understand why this recipe works nutritionally. The combination of lean protein (chicken) with healthy fats (olive oil, butter, cream) and leafy greens creates a meal that keeps you satisfied for hours. The Dijon mustard provides depth without added sugar, and the cream is actually less concerning than people think—full-fat dairy contains conjugated linoleic acid (CLA), which some research suggests may support body composition. The key is PORTION CONTROL and pairing this with vegetables, which we address in the serving suggestions section.
Tips and Tricks
- Pound your chicken evenly – If your breasts are uneven thickness (which they usually are), use a meat mallet to pound them to uniform thickness before filleting. This ensures even cooking across all pieces.
- Don’t skip the searing step – I know you want to rush, but those 4 minutes per side create Maillard reaction browning that adds incredible flavor. This cannot be replicated any other way.
- Use room temperature ingredients – Cold cream added to a hot pan can break the sauce. Let your cream sit on the counter for 10 minutes before using.
- Fresh is non-negotiable for spinach – Frozen spinach releases too much water and makes your sauce watery. Use fresh baby spinach exclusively.
- Keep your pan temperature consistent – Medium-low is your friend for the sauce. If it boils aggressively, reduce heat immediately to prevent the cream from breaking.
- Taste as you go – Everyone’s saltiness preference differs. Always taste your sauce before serving and adjust seasoning.
Make-Ahead and Meal Prep Guide
I’m OBSESSED with recipes that work with busy schedules, and this one is incredibly meal-prep friendly. Here’s my professional approach to prepping this ahead:
The night before: Prepare your seasoning blend in a small container and butterfly/fillet your chicken breasts. Store them in an airtight container in the coldest part of your refrigerator. Mince your garlic (store separately in a small container—garlic prepped too far in advance can develop off-flavors).
Morning of cooking: This dish comes together so quickly that I actually recommend cooking it fresh rather than reheating, BUT if you need to prep ahead, you can sear the chicken and cook it through completely, then refrigerate. Before serving, gently reheat everything together over medium-low heat with a splash of additional broth if the sauce has thickened too much.
Storage truth: This reheats beautifully for up to 3 days in an airtight container. The sauce actually tastes DEEPER and MORE complex the next day as flavors continue to meld. Perfect for lunch the next day!
Can I Store Baked Dijon Chicken Recipe?
Absolutely! This is one of those recipes that actually improves with storage as flavors deepen. Here’s exactly how to store it:
Refrigerator: Store your baked Dijon chicken in an airtight container for up to 3 days. The chicken maintains its tenderness and the sauce stays creamy and delicious.
Freezing: I recommend freezing JUST the sauce separately from the chicken. Freeze the sauce in a freezer-safe container or even ice cube trays for up to 2 months. Freeze the chicken cutlets separately on a parchment-lined baking sheet before transferring to a freezer bag for up to 3 months. Thaw overnight in the refrigerator and reheat gently together.
Reheating: Reheat gently over medium-low heat on the stovetop in a covered skillet with a splash of extra broth (about 2 tablespoons) for approximately 5-7 minutes until everything is warmed through. Do NOT reheat in the microwave if possible—the direct heat can break the cream sauce and toughen the chicken.
Nutrition Information
Based on USDA nutrition database calculations, each serving (with sauce, per 2 servings) contains approximately:
- Calories: 445 per serving
- Protein: 38 grams (77% of daily value)
- Total Fat: 24 grams
- Saturated Fat: 10 grams
- Carbohydrates: 6 grams
- Fiber: 1 gram
- Sodium: 680 mg (30% of daily value)
- Iron: 3 mg (from spinach, 17% of daily value)
From a dietitian perspective, this meal is well-balanced with protein for satiety, healthy fats for nutrient absorption, and greens for micronutrients. The sodium is moderate and comes mostly from the broth and seasoning—entirely within healthy ranges. If you’re watching sodium strictly, use low-sodium broth exclusively and reduce added salt slightly.
What Can I Serve With Baked Dijon Chicken Recipe?
This elegant protein plays beautifully with so many sides! The creamy mustard sauce is rich enough to be the star, so I recommend pairing it with lighter, more vegetable-forward sides. The key is balance—you want something that complements without competing. If you’re looking for starch ideas beyond what I list below, check out my best beef noodle recipe for inspiration on how to build satisfying plates with proteins and starches.
- Cauliflower rice – Keeps the meal lower-carb while soaking up that incredible sauce. You can make this at home (food processor) or buy pre-riced.
- Roasted asparagus with lemon – The bright lemon cuts through the richness of the cream sauce perfectly, and asparagus is nutritional powerhouse.
- Simple arugula salad with lemon vinaigrette – Peppery arugula provides textural contrast and the acidity balances the creamy sauce.
- Wild rice pilaf – Nutty, sophisticated, and absorbs sauce beautifully without being heavy.
- Roasted Brussels sprouts – Caramelized edges provide textural contrast, and the slight bitterness complements the Dijon perfectly.
- Buttered egg noodles – Classic pairing! The sauce clings beautifully to noodles. Toss with a little butter and fresh parsley.
- Sautéed mushrooms with garlic – Earthy, umami-rich, and absolutely luxurious alongside the creamy sauce.
- Roasted baby potatoes with herbs – Comforting and filling. The creamy sauce is PERFECT over potatoes.
Substitutes and Variations
- Whole grain mustard instead of Dijon – Creates a more textured sauce with visible mustard seeds. Slightly earthier flavor. Use same amount.
- Kale instead of spinach – Heartier green, requires an extra 2-3 minutes to wilt. Massaging with a little oil first makes it more tender.
- Half-and-half instead of heavy cream – Lighter option but sauce won’t be quite as rich or thick. You may need to simmer 2-3 minutes longer to achieve desired consistency.
- Fresh tarragon instead of Italian seasoning – Classic French combination. Use 1 teaspoon fresh tarragon (or ½ teaspoon dried) and omit the Italian seasoning entirely.
- Bone-in, skin-on thighs instead of breasts – Higher in fat but MORE forgiving if you accidentally overcook. Increase cooking time to 6-7 minutes per side. Thigh meat also pairs beautifully with Dijon.
- Vegetable broth for the protein – Makes this vegetarian. Use the same amount. Add a splash of soy sauce for umami depth to replace the savory notes chicken broth provides.
- Gruyère cheese instead of Parmesan – Nutty, richer flavor. Use 2 tablespoons grated (slightly less than Parmesan because it’s more assertive).
- Add mushrooms – Slice 1 cup baby bella mushrooms and sauté in the butter with garlic for 2 minutes before adding broth. Incredible umami addition.
Common Mistakes to Avoid
- Skipping the searing step or turning heat too high – This is the biggest mistake I see. The pan MUST be medium, not high. High heat burns the outside while leaving the inside raw, and it breaks down the proteins. Medium gives you that golden crust with proper cooking through.
- Adding cold cream directly to the hot sauce – This breaks the sauce and creates a broken, grainy texture. Always temper cream slightly or add it slowly while stirring constantly.
- Overcrowding the pan – If your skillet is too small and you stack the chicken, it steams instead of sears. Use a 12-inch skillet minimum. If you don’t have one, cook the chicken in two batches.
- Using pre-shredded Parmesan – The anti-caking agents in pre-shredded varieties won’t melt smoothly into the sauce. Always grate fresh cheese directly into your dish.
- Letting the spinach sit too long after wilting – Spinach continues to release water and can make your sauce watery if left sitting. Add it in step 8 and serve within 5 minutes.
Seasonal Variations
Spring version: Replace spinach with fresh asparagus (chop into 2-inch pieces) and add 1 tablespoon fresh lemon juice to the sauce. Add fresh tarragon instead of Italian seasoning. The bright, herbaceous notes feel fresh and seasonal.
Summer version: Keep the spinach but add ½ cup halved cherry tomatoes in the final step. Add fresh basil (torn, not chopped) and ¼ teaspoon red pepper flakes for brightness and slight heat. Serve alongside a fresh green salad.
Fall version: Add 1 cup sliced mushrooms (sautéed separately in a little butter until golden) and swap spinach for kale. Add a pinch of smoked paprika to the seasoning blend for depth.
Winter version: Add ½ cup roasted Brussels sprouts (halved) and 2 tablespoons sun-dried tomatoes (chopped). The heartier vegetables and concentrated tomato flavor feel cozy and warming.
Baked Dijon Chicken Recipe
Ingredients
Method
- In a small bowl (a cereal bowl works great), combine your Italian seasoning, garlic powder, onion powder, salt, and freshly cracked black pepper. Stir everything together with a fork until well mixed. This takes about 30 seconds and ensures your chicken gets evenly seasoned. PRO TIP: If your Italian seasoning is old (over one year), buy fresh—dried herbs lose potency quickly and you'll taste the difference.
- This is CRITICAL for even cooking. Take each chicken breast and carefully place it on your cutting board. Using a sharp chef's knife (dull knives are actually MORE dangerous because they slip), position the blade horizontally about halfway through the thickness of the breast. Gently slice through while keeping your hand flat on top, creating two thinner cutlets from each breast. You should end up with four cutlets total—this DRAMATICALLY reduces cooking time and ensures nothing gets dried out. Pat each cutlet dry with paper towels (moisture prevents browning) and season both sides generously with your seasoning blend.

- Place your large skillet over MEDIUM heat (not high—patience is your friend here). Add your olive oil and let it heat for about 90 seconds. You'll know it's ready when you swirl the oil and it flows easily across the pan. If you drop a tiny piece of chicken in and it immediately sizzles loudly, you're good to go. This step prevents sticking and creates that beautiful golden crust. SAFETY WARNING: Keep your face and hands back from the pan when placing chicken—the hot oil can splatter. Always use tongs or a spatula to place protein, never your hands.

- Once your pan is hot, carefully place all four cutlets into the oil. DO NOT touch them for 4 minutes—I know it's tempting, but this is how you build that golden crust. After exactly 4 minutes, flip each cutlet and cook the other side for another 4 minutes. The chicken should be golden brown on both sides and cooked through (165°F internal temperature if you want to verify with a meat thermometer, which I highly recommend). Remove the cooked chicken to a clean plate and cover it loosely with foil or a lid to keep it warm. Don't worry if it seems slightly underdone—it'll continue cooking when we return it to the sauce.

- In the SAME skillet (all that flavorful fond is still there!), reduce heat to MEDIUM-LOW and add your butter and minced garlic. Sauté for exactly 1 minute—you want the garlic fragrant and starting to turn golden, NOT brown or bitter. This smell is INCREDIBLE and tells you your pan temperature is perfect.
- Pour in your chicken broth and immediately use a wooden spoon to scrape up all those browned bits from the pan bottom. This is where the magic happens—those bits contain concentrated chicken flavor. Add your Dijon mustard and Worcestershire sauce, stirring until completely combined. You should see the sauce lighten slightly and smell absolutely divine. Pro tip from my dietitian experience: The Dijon mustard here adds brightness AND probiotic cultures if you're using unpasteurized varieties. The fermented nature of mustard aids digestion and adds complexity without salt.
- Pour in your heavy cream and sprinkle in your freshly grated Parmesan cheese. Stir everything together and let the sauce simmer gently for 5 minutes. This allows the flavors to meld and the sauce to thicken slightly. Taste it at this point—if you want more salt or pepper, add a pinch. Remember, you can always add more seasoning, but you can't remove it.
- Add your fresh spinach to the sauce, stirring constantly. Within 2-3 minutes, the spinach will completely wilt into the sauce. It looks like you added a massive amount of greens, but trust me—it shrinks dramatically. This adds nutrients (iron, folate, vitamin K) and creates a beautiful, vibrant sauce.
- Return your golden chicken cutlets to the skillet, nestling them into the Dijon sauce. Spoon some sauce over each piece and let everything heat through for about 2 minutes. The chicken should be hot throughout and the sauce should be bubbling gently around the edges. Transfer to plates immediately and serve HOT. The plating itself makes this feel restaurant-quality—arrange the chicken on the plate and spoon extra sauce over top.

Notes
FAQs
Can I use chicken thighs instead of breasts?
Absolutely! Thighs are actually BETTER for this recipe because they contain more fat and stay moist even if slightly overcooked. Thighs also pair beautifully with Dijon mustard. If using bone-in, skin-on thighs, increase cooking time to 6-7 minutes per side and don’t butterfly them—just cook them whole. If using boneless, skinless thighs, butterfly them slightly thicker than chicken breasts and cook 5-6 minutes per side. The sauce preparation remains identical.
What if my sauce breaks (looks curdled)?
Don’t panic! This happens when cream is added too quickly to a boiling sauce. Remove the pan from heat immediately and let it cool slightly (2-3 minutes). Slowly whisk in 2 tablespoons of cold cream while whisking constantly. If that doesn’t work, you can strain the sauce through fine-mesh sieve and reheat gently. For next time, ALWAYS reduce heat to medium-low before adding cream and add it slowly while stirring.
Can I make this without cream?
You can, but the sauce will be thinner and less luxurious. If avoiding dairy entirely, use full-fat coconut cream instead (same amount). The flavor will be different but still delicious. If you’re avoiding dairy for allergy reasons but not preference, you could use a quality cashew cream, which you can make by blending ½ cup raw soaked cashews with ½ cup broth until completely smooth. This creates a surprisingly rich, creamy sauce.
How do I know when the chicken is done without a meat thermometer?
I ALWAYS recommend a meat thermometer (they’re inexpensive and remove all guesswork), but if you don’t have one: cut into the thickest piece with a sharp knife. The meat should be completely white/pale with NO pink, and the juices should run clear. If you see any pink, cook 2-3 minutes longer. Overcooked chicken is better than undercooked when it comes to food safety.
Can I prepare the chicken and seasonings ahead of time?
Yes! You can prep the chicken the night before. Butterfly/fillet your chicken breasts and store in an airtight container in the coldest part of your refrigerator. Prepare your seasoning blend in a small container. The morning you cook, pat the chicken dry and season it right before cooking. Mince garlic fresh the day of cooking—garlic prepped too far ahead develops sulfur compounds that taste off.
What kind of Dijon mustard should I use?
Any authentic Dijon mustard works beautifully—Grey Poupon is the most accessible and excellent quality. Whole grain Dijon creates a slightly different texture but same great flavor. Avoid “spicy brown” mustard or generic yellow mustard—these have different flavor profiles and won’t create the same result. The beauty of Dijon is its balanced, sophisticated tang without overpowering heat.
More Recipes You’ll Love
- Best Chicken Gravy Recipe – Perfect for when you want a slightly different sauce treatment for chicken, with deeper savory notes
- The Best Béchamel Sauce – Master this classic cream sauce technique and apply it to countless dishes beyond just chicken
- Beef Stew Recipe In The Slow Cooker – When you want those same creamy, comforting flavors but with beef and a hands-off cooking method
My friends, I absolutely LOVE this baked Dijon chicken recipe because it proves that restaurant-quality cooking doesn’t require hours in the kitchen or a culinary degree. It requires understanding technique, respecting your ingredients, and taking 30 minutes to do something REALLY well.
This recipe has been featured at my family dinners, taught to countless clients navigating how to cook healthy proteins, and honestly, it’s become the go-to when I want something that feels fancy but doesn’t stress me out. The combination of that golden chicken with the silky, sophisticated mustard sauce is honestly one of my favorite flavor combinations.
I want you to feel confident making this. Start with this exact recipe once, learn how the technique works, THEN play with substitutions and variations. That’s how you become someone who can cook intuitively rather than always following recipes. You’ve got all the information you need—your creamy Dijon chicken masterpiece is waiting. Let’s make cooking a breeze!
